Control the host
Control the host turns a phone, iPad or tablet into a remote for the computer that runs Cliqer. The person at the mixing desk can run the show from anywhere in the venue, without going back to the computer: the presenters, the timer, the room link, Studio and the host's settings are all on the device.
It controls the host's Cliqer. It is not the presenter view: there are no notes, laser or drawing, see Presenter tools. The Show tab does have Previous and Next buttons, which press the host's own buttons.
Pair a device
Pairing works like linking WhatsApp Web. The computer shows a QR code and the device scans it. There is no sign-in and no approval step to click on the computer.
- On the computer, open the main window of the Cliqer desktop app and click the device icon at the top (its tooltip starts with "Remote control"), or open Settings and find Remote control. The Pair a device window opens with a QR code, the three steps and the list of paired devices.
- On the device, open Cliqer Remote and tap Control the host, the computer icon at the top left of the Join screen.
- Tap Scan pairing code and point the camera at the QR code. If the camera cannot read it, tap Enter code instead and type the ten characters under the QR code.
- Give the device a name if you want one (the box starts filled in with the name of the device). The computer lists it under that name.
- The device asks you to confirm it is you: Face ID or Touch ID on an iPhone or iPad, a fingerprint, face or screen lock on Android, or the device passcode. This also guards the key that proves the device is the one that was paired. It asks once each time the device connects to a host, not for every tap.
- The computer shows a notice, "
paired", and the device shows Your hosts with the host and, if one is open, its room, under This device is paired.
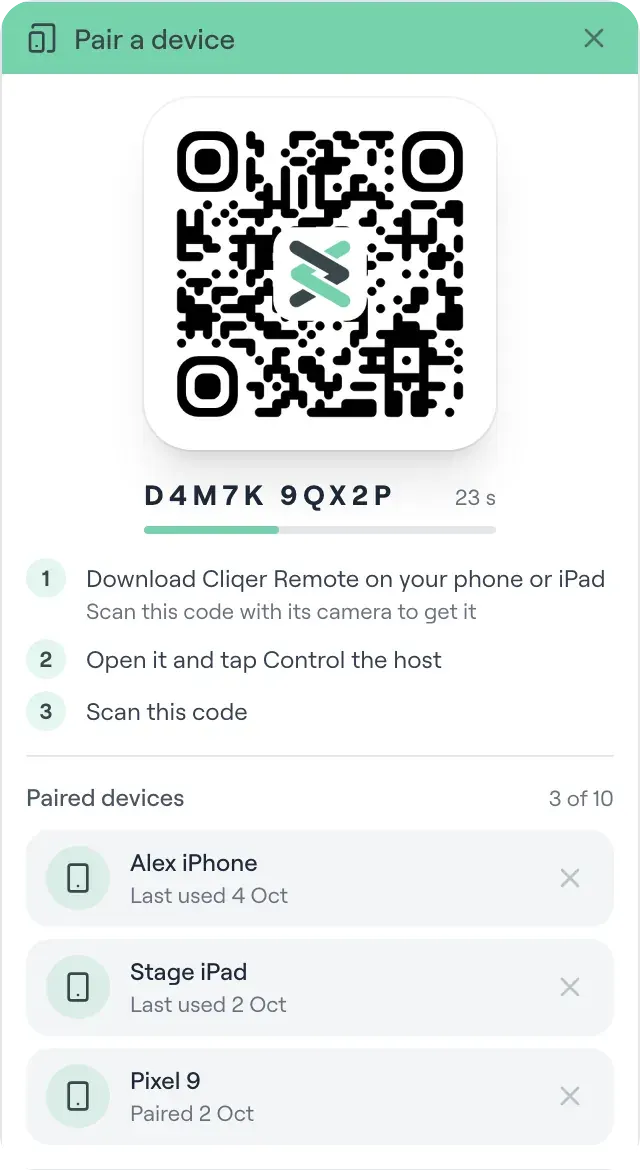
The Pair a device window on the computer: the QR code and its 60 second countdown, the three steps (step 1 is Download Cliqer Remote, and the same code opens the store listing from a phone camera) and the paired devices, with an x to remove each.
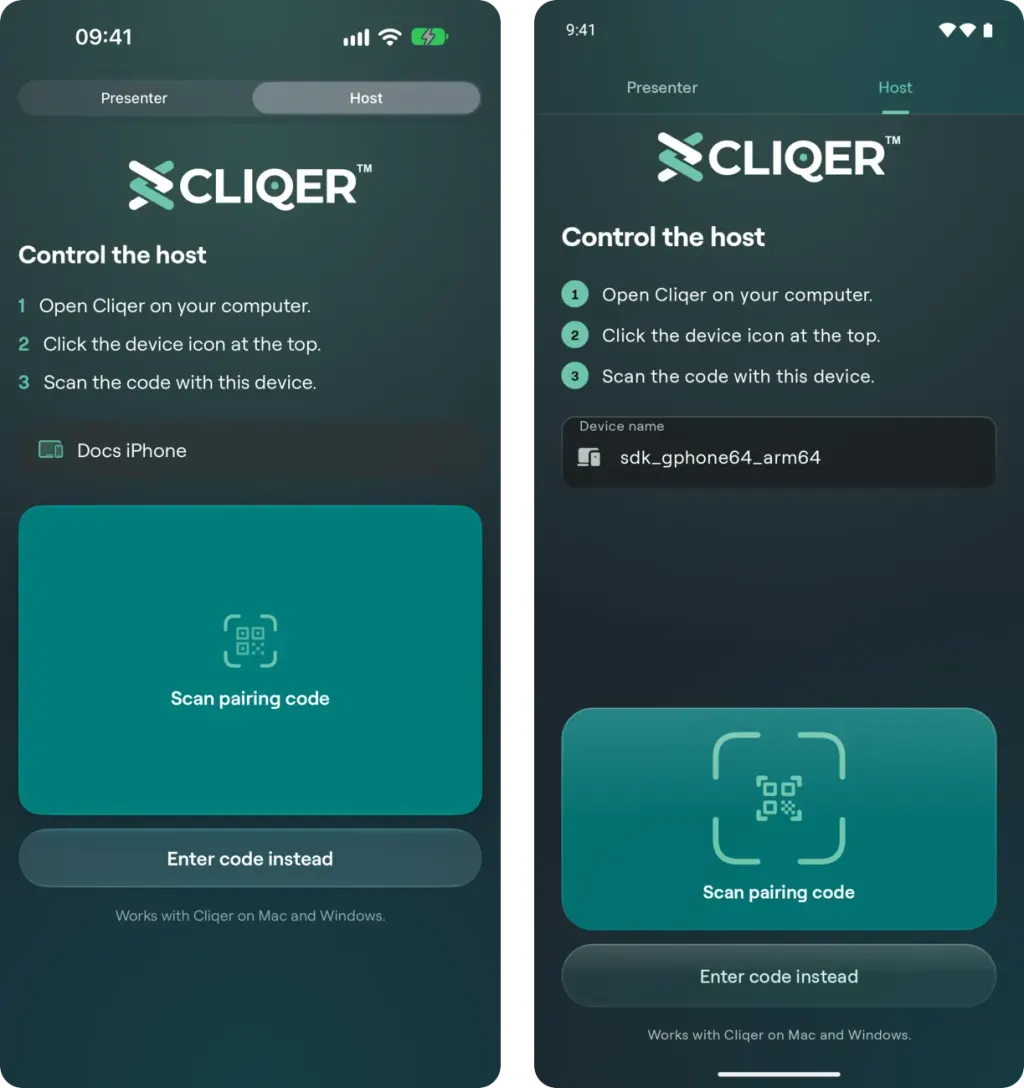
On the device: Control the host shows the same three steps, a box for the device name and the Scan pairing code card, with Enter code instead below it (iPhone left, Android right).
You can also scan the QR code with the ordinary camera app of the phone or tablet. The code is a link to cliqer.io/pair, and with Cliqer Remote installed it opens the app on the pairing screen. Without the app it shows a page that points you to the store listing.
The code lasts 60 seconds, works once, and renews itself while the Pair a device window is open. A computer can have up to 10 paired devices; the window asks you to remove one before pairing an eleventh ("This computer already has 10 paired devices").
What the device shows
Once a device is paired, the computer icon on the Join screen is replaced by a Presenter | Host switch at the top of the app. Presenter is the Join screen and the room you are in. Host is your computers and their controls. A room you are in keeps running while you look at Host, and after you have opened a host, the Join screen offers one button, Join followed by the code of the room that host has open.
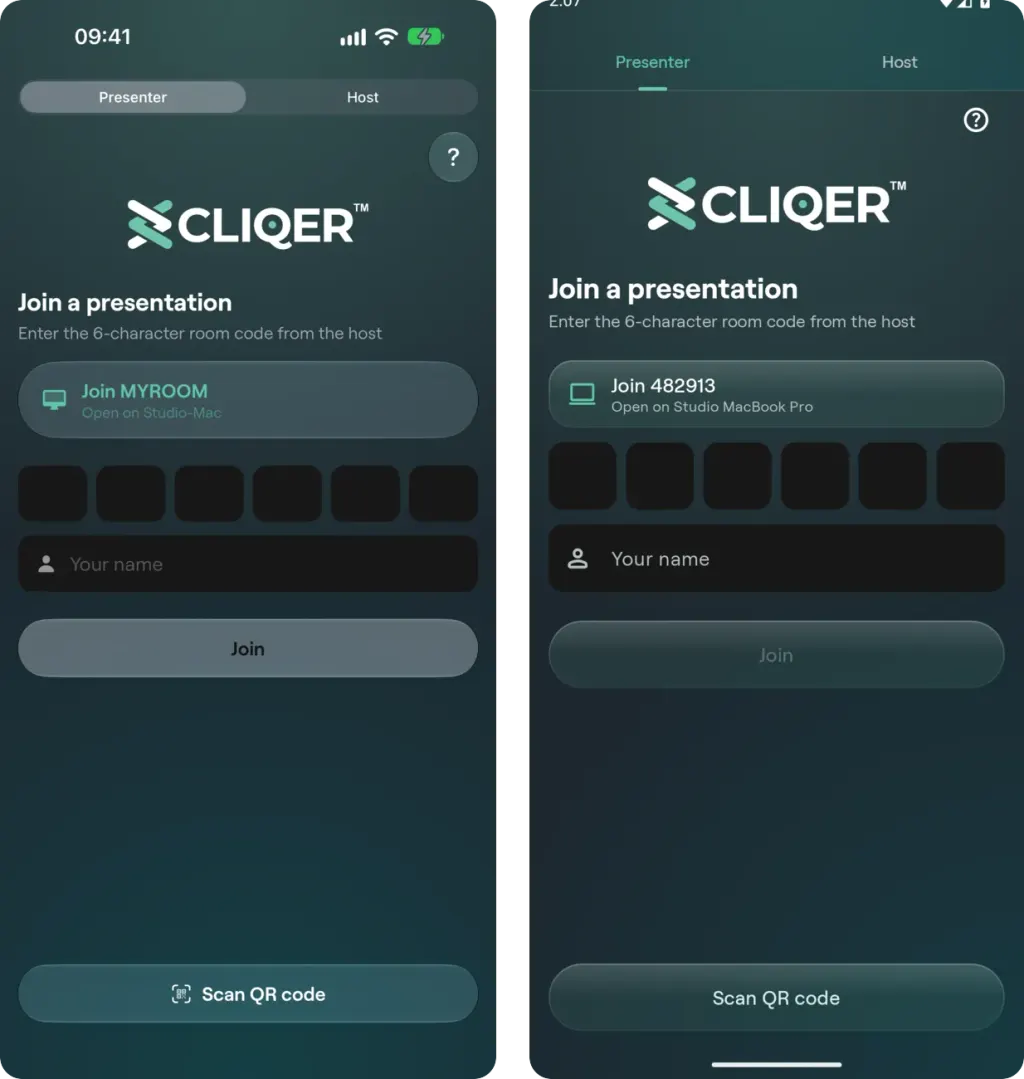
The Presenter | Host switch (iPhone left, Android right). On Join, the button for the room the host has open saves typing the code.
Open a host from Your hosts. The controls are in three tabs, named after the host's own places: Show (the main window), Studio (the Studio window) and Settings (the Settings menu). You only see what that host offers.
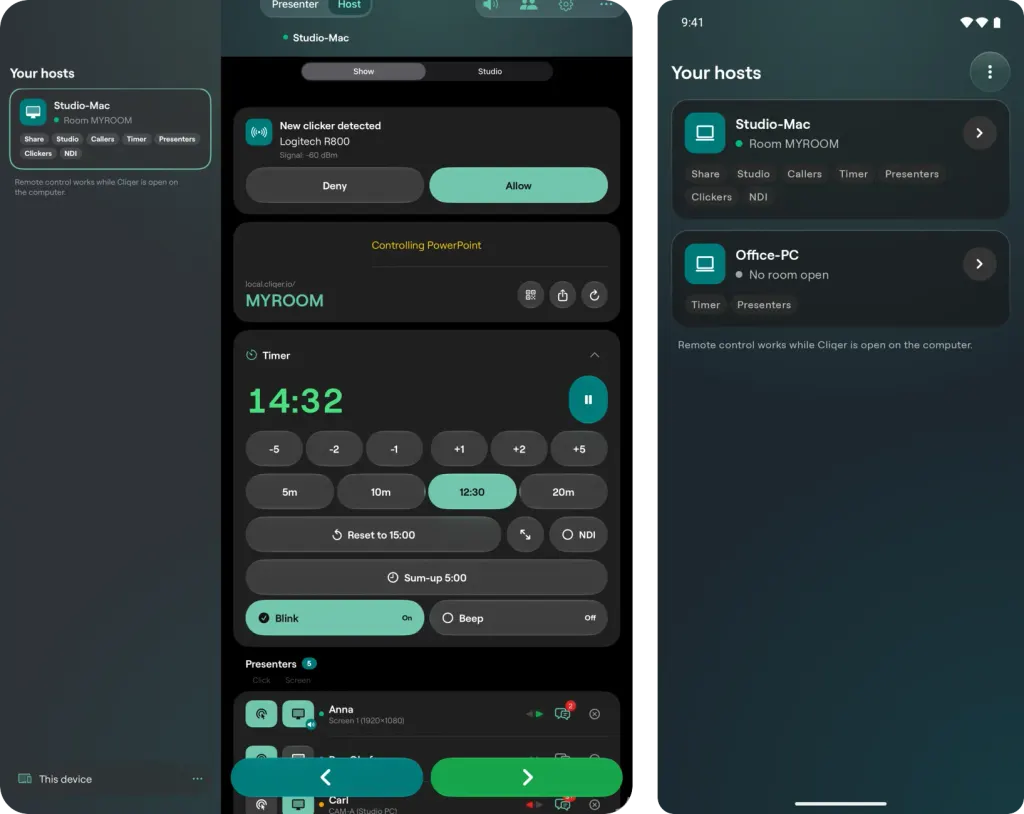
Your hosts lists each paired computer that has Cliqer open, with its room and the places it offers. On an iPad (left) the list stays beside the controls; on an Android phone (right) it is a screen of its own.
The top bar has the host's name with a green dot while the device is connected, the Sound effects and Studio window buttons of the host's own banner, and a menu with How remote control works and Unpair this device.
Show
- Room link: the room code, its QR code, Share link and Copy link. Tap the room code to give the room a name of your own, six letters or digits. The refresh icon asks "Refresh link?" first, because it ends the session and anyone with the old link needs the new one.
- New clicker: when a Bluetooth clicker asks to join, New clicker detected offers Allow and Deny.
- Timer: start or pause the timer, add or take away minutes (steps of 1, 2 and 5), set an exact time in minutes and seconds, reset it to the set time, or tap one of the timer presets. The presets are the ones set on the host computer, and the one used last stays lit. When a Limitimer is connected, Sum-up, Blink and Beep are here too. See Timer.
- Presenters: everyone connected to the room is listed, as on the host. Each row has a Click switch that grants or takes away clicking, and a Screen switch that sends the host's screen to that presenter (turning it on opens the list of displays, NDI sources and the Studio program to pick from). Tap a presenter for the chat with them, Rename, Remove and Block. Remove drops a presenter now; they can rejoin after about a minute. Block keeps them out until you allow them again from the Blocked list.
- Previous and Next: two large buttons at the bottom press the host's own Previous and Next.
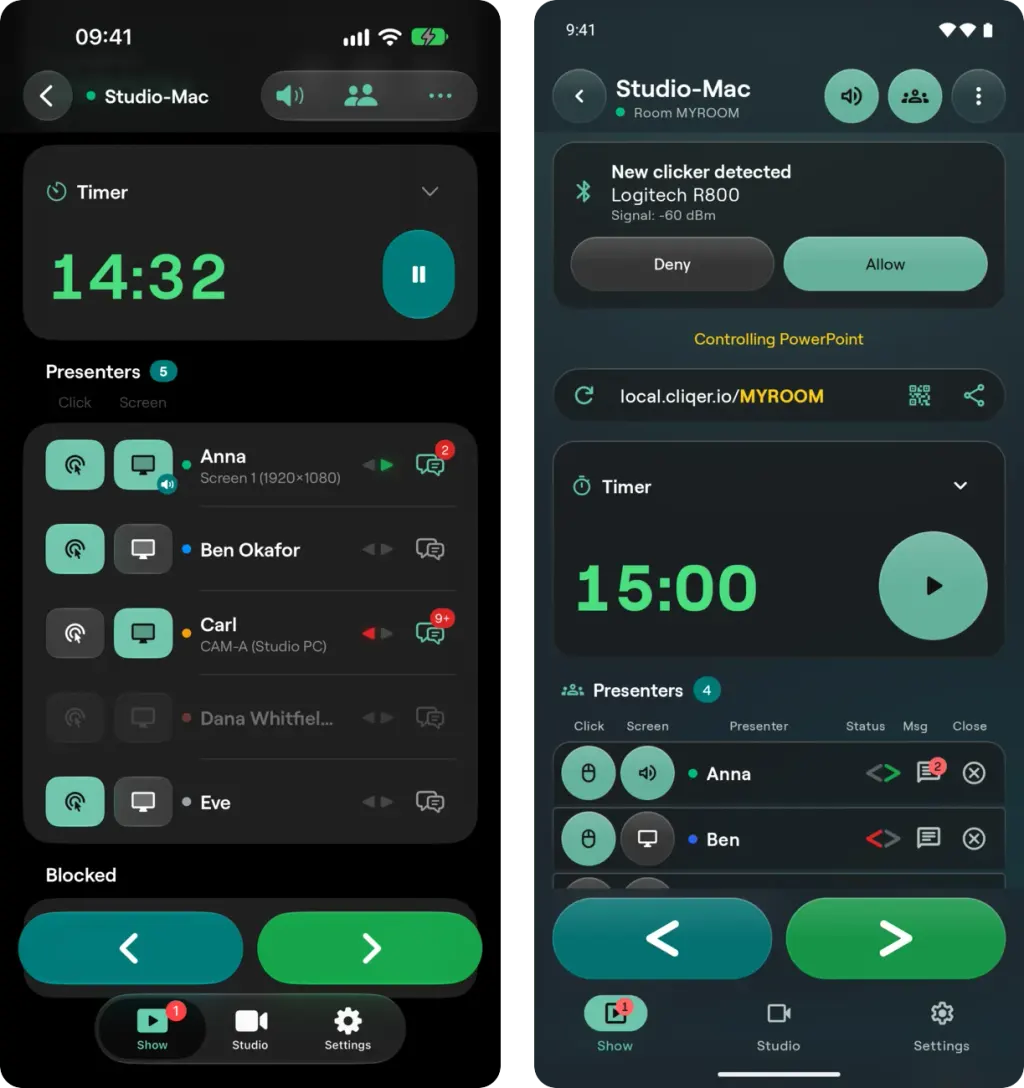
The Show tab (iPhone left, Android right): the room link, the timer, the presenters with their Click and Screen switches, and the Previous and Next buttons at the bottom.
Studio
The Studio tab appears when the room plan includes callers (Pro and up). It shows what the Studio window shows. If Studio is not open on the computer, the tab says "Studio is closed on the host" and offers Open Studio. See Studio.
- Preview and Program, with Cut or Fade and TAKE. Tap an input to put it on Preview, and double-tap it to cut it straight to Program. The menu of an input also has Fit or Fill, NDI, Room and Remove.
- Add input: screens and NDI sources, or People, to invite a presenter to call in on camera.
- Outputs: the Room and NDI switches that choose where each input is sent, the program mix, the monitor and the output audio.
- Callers: each caller's camera and microphone state, with Hang up, the return feed and Clear program.
- Audio mixer: the levels, mute and routing of the host's mixer.
The Studio T-bar is the one thing that stays on the computer, because a drag cannot travel the connection. Use Fade and TAKE instead.
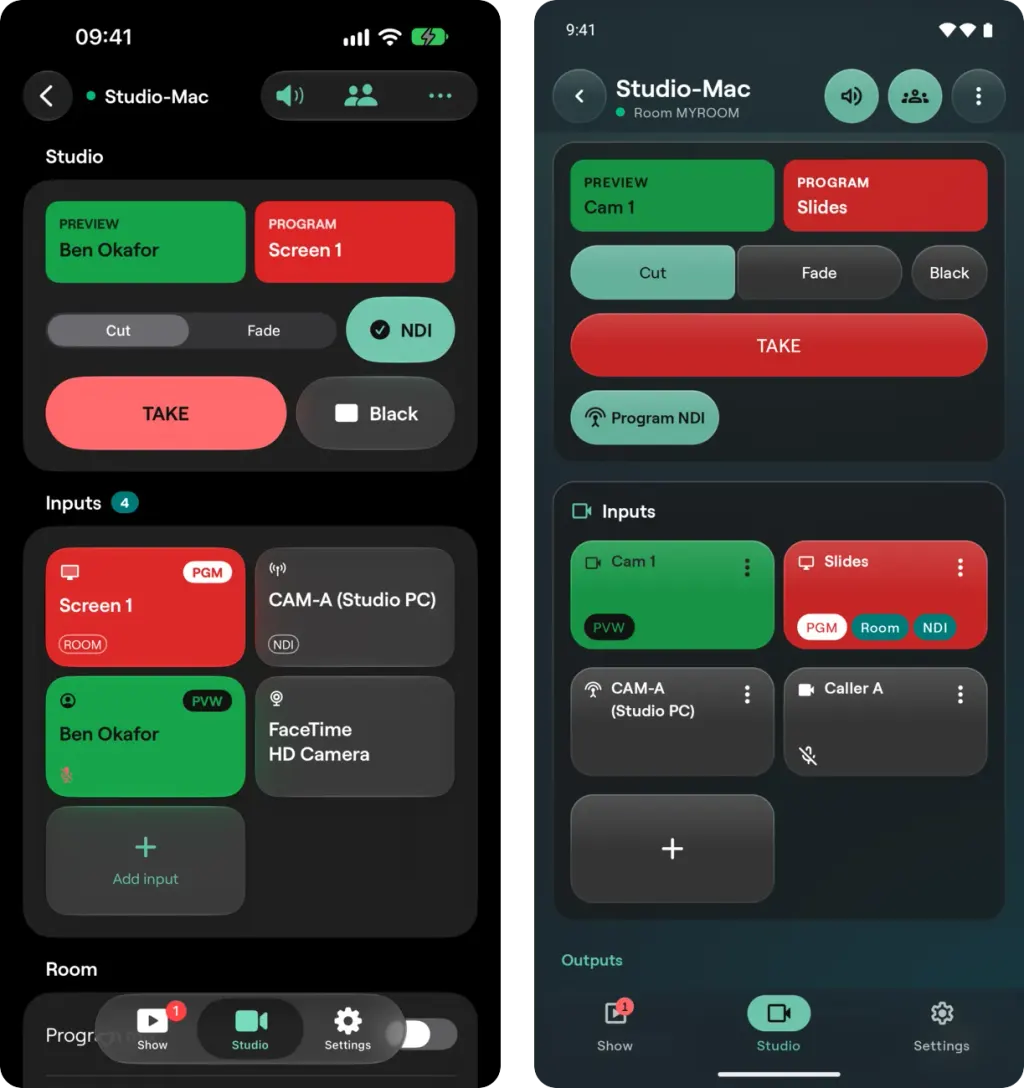
The Studio tab: Preview and Program, Cut or Fade, TAKE, and the inputs you can put on air (iPhone left, Android right).
Settings
The Settings tab mirrors the host's Settings menu, in its order, so a setting is where it is on the computer: Appearance (dark mode, glass, My Account), Control Mode, Audio, Video Encoding, Behavior (click enabled, screen sharing, laser pointer, Clear drawing, count down or up, click delay and the rest), Timer Display, Clickers (rename, block or forget a Bluetooth clicker, and see a connected DSAN PerfectCue or Limitimer), Privacy and NDI output, Pair device and Danger Zone. Clear drawing wipes every presenter's drawing on every screen, as on the computer, and works while Laser Pointer is on. See DSAN and NDI Output.
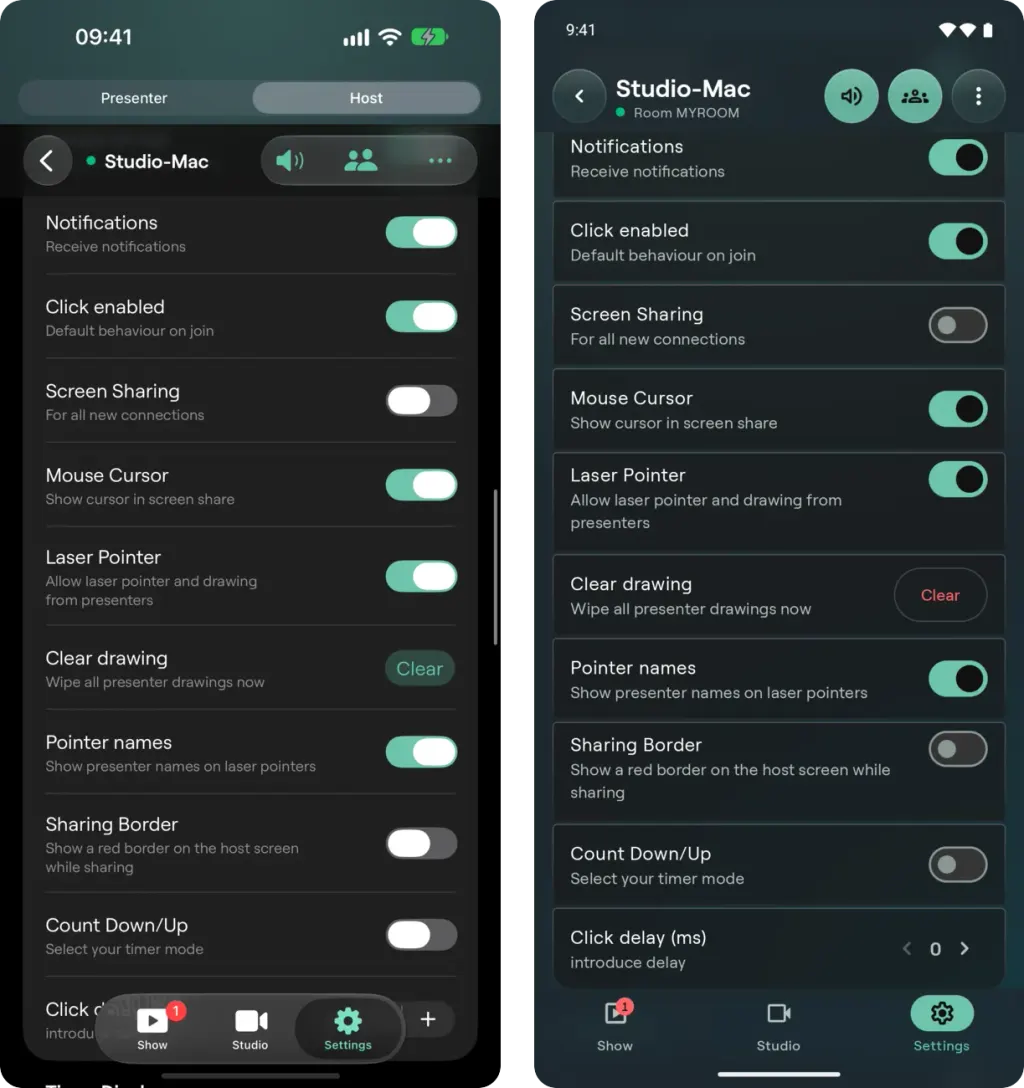
The Settings tab follows the host's own Settings menu. In Behavior, Clear drawing sits right under Laser Pointer; its Clear button wipes every presenter's drawing (iPhone left, Android right).
Pair device shows whether the Pair a device window is open, with a Close button, and lists the paired devices ("3 of 10") with Remove. Your own device is marked This device and has Unpair this device.
Danger Zone has Reset All Settings and Log out. Both ask for confirmation, and both end remote control. Reset wipes the host's settings, licence key and sign-in, and every paired device has to pair again. After a log out, remote control comes back when someone signs in on the computer. Signing in, entering a licence key and the macOS permissions have to be done on the computer.
A computer that is not up to date may show only some of these groups. The tab says "Update Cliqer on your computer to change every setting from this device" when it is missing the Settings controls altogether.
How long it lasts
A paired host is in the list while Cliqer is open on it. Quit Cliqer, or log out of it, and the host leaves the list; open it again and it comes back without pairing again. The pairing belongs to that installation of Cliqer, not to an account.
Two things forget the pairing, and the device then has to be paired again:
- Reset all settings or clear all data in the desktop Settings, or Reset All Settings from a paired device.
- Removing the device, below.
Remove a device
- On the computer: in the Paired devices list, every paired device is shown with the date it paired or was last used. Click the x next to a device to remove it. The device is told that it was unpaired and stops listing the host.
- On the device: open the three-dot menu in Your hosts, tap Unpair this device and confirm. The device needs an internet connection for this; without one, remove it on the computer instead.
- From another paired device: in Settings, Pair device, tap Remove next to a device and confirm.
Plans
Pairing and the Show and Settings controls need no particular plan, although a few settings follow the host's plan exactly as on the computer, for example Glass. The Studio tab follows the plan of the room, because Studio and callers start on Pro. See Pricing.
Privacy
See Privacy and security for what the pairing keeps on the device and the computer.
Calling In
Join a Cliqer call with your phone camera and microphone when the host invites you from Studio.
Watch Apps
Move slides from your wrist with the Cliqer Remote apps for Apple Watch and Wear OS. Next and Back, the slide number and the timer, linked to your phone or on their own with a room code.