Audio Mixer
The Audio Mixer panel mixes the sound of your inputs into the Program mix. Each input that carries sound gets a strip. Strips are sent to Master (the Program mix), to any Group (a bus you assign strips to), to any Return (a bus fed by a send level per strip) and to the Headphones mix. The room and the NDI output each listen to the bus you choose. You add, rename, reorder and remove buses yourself, with no fixed limit; a new show starts with Bus A and Bus B, two Groups.
Which outputs hear which bus is one setting per output, so the room can hear Master while the NDI output hears a Group, for example. Only Master, the headphones mix and Groups can be chosen: a Return has no such choice, because it always runs into Master. Solid arrows are the Program mix. Dotted arrows are sends and choices you make.
What gets a strip
- Any input with sound: a camera with a microphone, a screen with system sound, media and lists, NDI sources with audio, audio inputs, and people on a video call.
- A fixed Microphone strip for the host microphone.
- Each strip takes its name from the input. Until an input with sound exists the inputs area says "Channels appear with inputs that carry audio" (macOS) or "No audio channels yet." (Windows).
An input can borrow sound from somewhere else. In the input settings, the Audio setting (macOS) or the Audio follows menu (Windows) chooses Its own, None, or another strip. On Windows that list also offers Microphone and Computer sound.
The sound of an input follows its picture only if you want it to: set AFV (audio follows video) on the strip, and it goes to air only while that input is on Program.
Layout of the panel
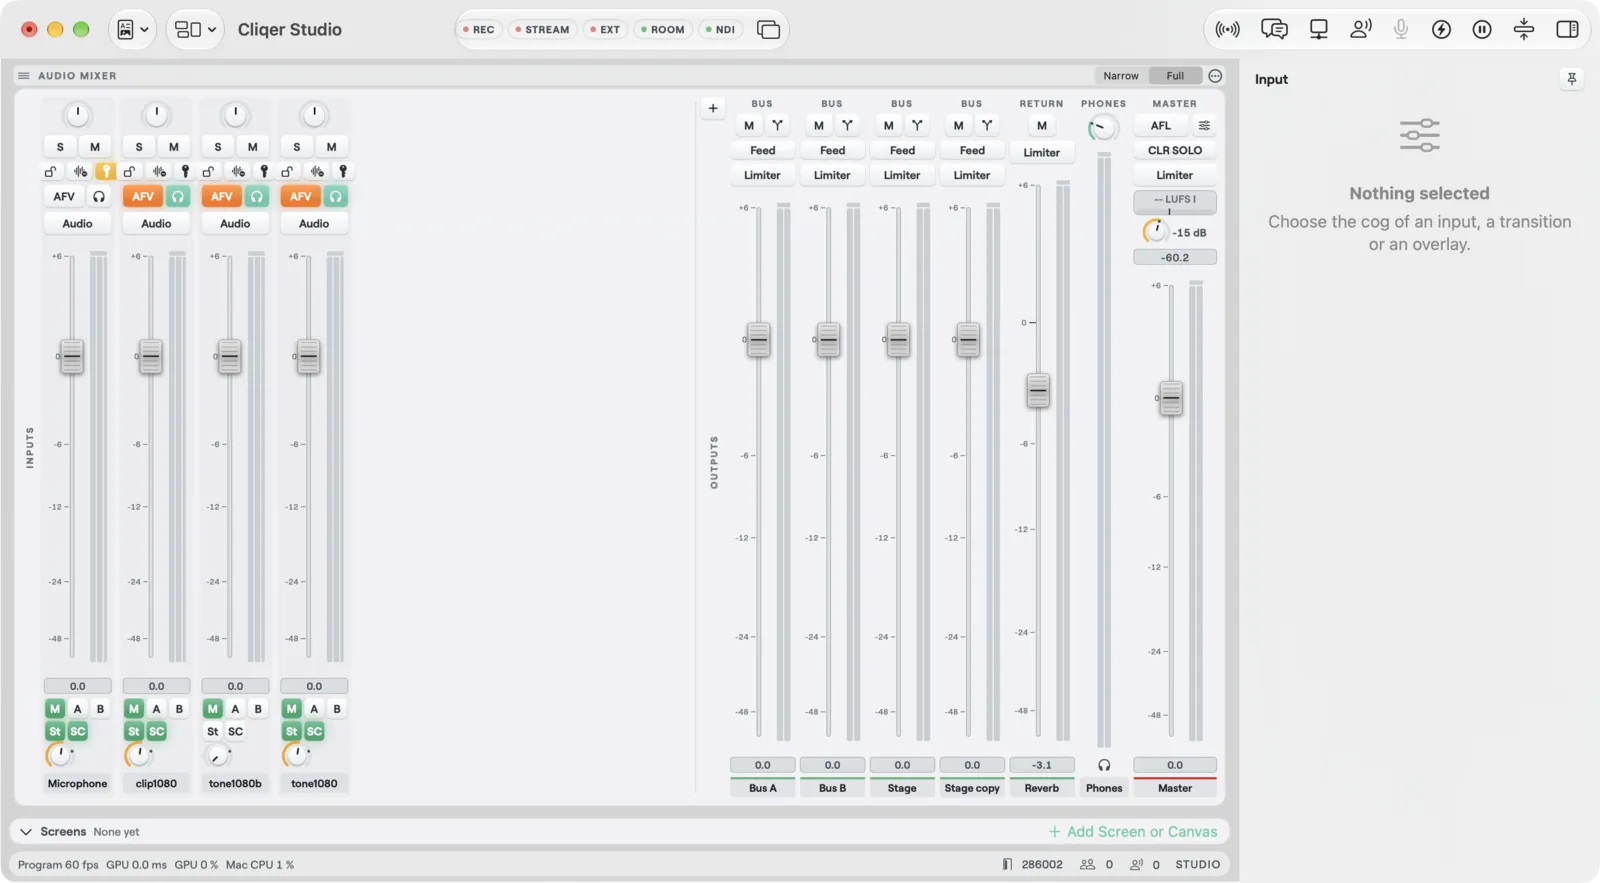
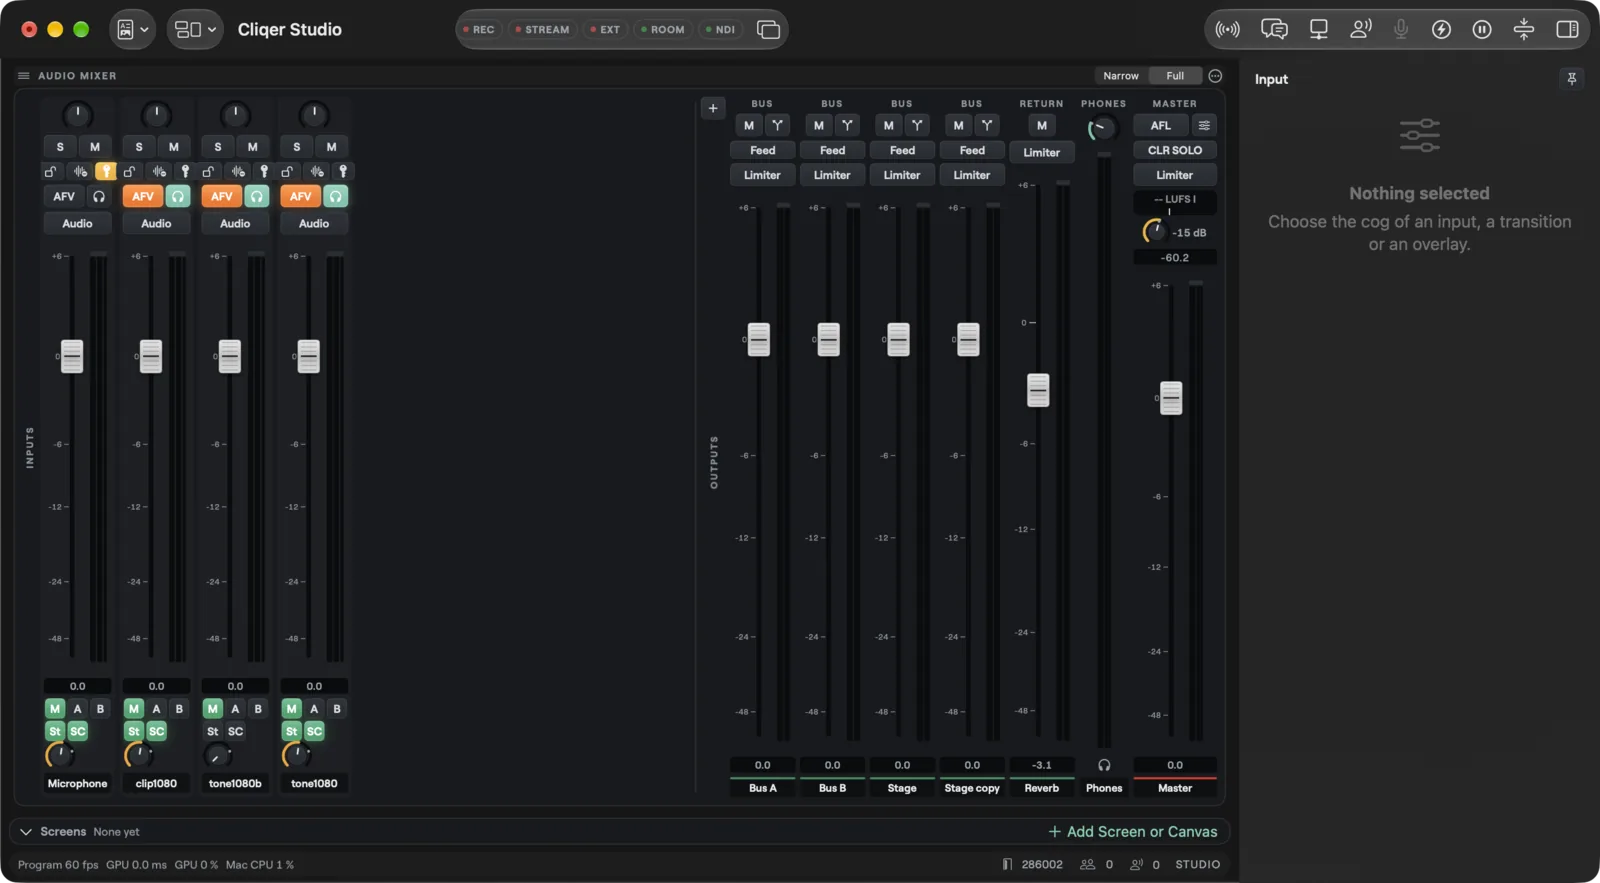
Input strips scroll sideways on the left, under the vertical label INPUTS. A strip that does not fully fit is shown cut at the edge of the section, never hidden, and you scroll the row to bring it in. The outputs are pinned on the right, under OUTPUTS: your buses, then Phones and Master. The + key in the header adds a bus (see Add, rename and remove buses).
- Strips (Narrow or Full) in the header switches all strips at once. Double-click a strip's name plate to switch one strip.
- Drag a blank part of a strip to move it, even across the divider between inputs and outputs. A line shows where it will land. Dropping on free space in the inputs area sends it to the end.
- Right-click a strip: Full Strip or Narrow Strip, Move Left, Move Right, All Strips Narrow, All Strips Full.
- The same menu of an input strip opens with Copy Settings and Paste Settings. See Copy and paste strip settings.
- Drag the divider between INPUTS and OUTPUTS to give the buses more or less room. It moves one whole strip at a time, so neither side ever shows half a strip, and Phones and Master stay pinned at the right. The outputs take at most 70 per cent of the mixer and always leave room for one whole input strip. With VoiceOver, increment and decrement move it one strip.
- Order, widths and the divider are saved with your layout.
- Show or hide the whole panel with Studio > Audio Mixer (Option+Command+M) or the mixer key in the bottom bar. Basic mode hides the mixer without closing it.
The layout is the Mac's, with the same sizes. INPUTS are strips that scroll in the middle (a strip that does not fully fit shows cut at the edge, never hidden); OUTPUTS are pinned on the right: Returns first, then Groups in the order of the show, then Phones and Master. Drag the divider between INPUTS and OUTPUTS to give the buses more or less room. It moves one whole strip at a time, so no bus is ever cut in half, and Phones and Master stay pinned at the right. The buses take at most 70 per cent of the panel and always leave room for one whole input strip. Buses that do not fit scroll. The + Bus and + Return keys in the header add buses. In Studio's default layout the mixer sits to the right of the inputs.
- The Narrow and Full keys in the panel header switch all strips at once. A strip's own menu changes just that strip.
- Right-click a strip's name for its menu. It includes Full strip or Narrow strip for that strip, and Pin to the right or Move to the scrolling strips to move it between the pinned side and the scrolling area.
- The mixer shows only when the screen is tall enough for it. Ctrl+Alt+M shows or hides it, as does the Audio Mixer toggle in the Inputs panel.
- If the panel is shorter than a full strip it scrolls up and down.
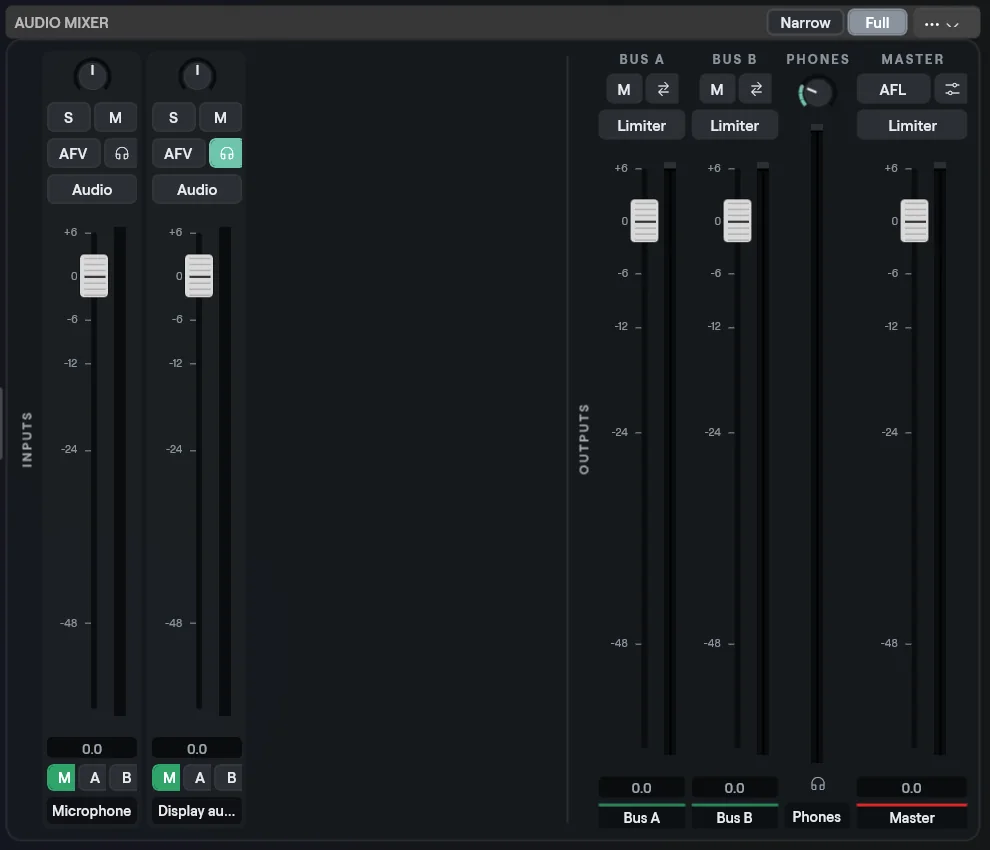
An input strip
From top to bottom:
| Control | What it does |
|---|---|
| Pan knob | Pan left and right. Double-click to centre. Hidden in narrow strips |
| S | Solo: listen to this strip. Amber when on |
| M | Mute. Red when on, and the strip dims |
| AFV | Audio follows video: on air only while its input is on Program. Hidden in narrow strips |
| Headphones key | Send this strip to the headphones mix. Hidden in narrow strips |
| Audio | Opens the audio processing panel for this strip. Lit while the processing changes the sound. Hidden in narrow strips |
| Fader and meter | Level (see below) |
| M, then a key per Group, then a knob per Return | Sends. See Sends. Hidden in narrow strips, where one Sends key opens a menu instead |
| Name plate | The input's name over a stripe: red on Program, green on Preview, otherwise the category colour. Click it to open that input's settings |
Narrow strips keep only S, M, the fader, the meter and the name.
| Control | What it does |
|---|---|
| Pan knob | Pan left and right. Hidden in narrow strips |
| S | Solo (listen to this strip) |
| M | Mute |
| AFV | Audio follows video: on air only while its input is on Program. Hidden in narrow strips |
| Headphones key | Send this strip to the headphones mix. Hidden in narrow strips |
| Audio | Opens the audio processing panel for this strip. Hidden in narrow strips |
| Fader and meter | Level (see below) |
| M, then a key per Group, then a knob per Return | Sends. See Sends. The block scrolls when there are many buses. Narrow strips keep none of them, so use Send to in the strip menu |
| Name plate | The input's name over a stripe. Drag it to move the strip. Right-click it for the strip menu |
Narrow strips keep only S, M, fader, meter and name.
The strip menu (right-click the name) has: Solo (listen), Audio follows video, Mute, Send to (Master, every Group, every Return, Headphones), Unity gain (0 dB), Centre pan, Audio processing... (see Audio processing) and Solo mode (AFL: solo after the fader or PFL: solo before the fader), then the layout items from Layout of the panel and Assign Shortcut, MIDI or OSC... for the strip's mute. It also has Copy Settings and Paste Settings, see Copy and paste strip settings.
Copy and paste strip settings
Right-click an input strip (on macOS also its Audio key) for Copy Settings and Paste Settings. Both open the same list: All; Level, Pan, Routing, Sends, Ducking; Processing; then each processing stage: Delay, High-pass, Equaliser, Gate, Compressor.
Copy a part on one strip, then paste it on another. Paste takes the copied strip's settings as they are at that moment, and is one undo step. Paste Settings is dimmed for a part the copy does not hold, and on the copied strip itself. The copy is only a mark while the app runs, it is never saved with the show.
Audio processing
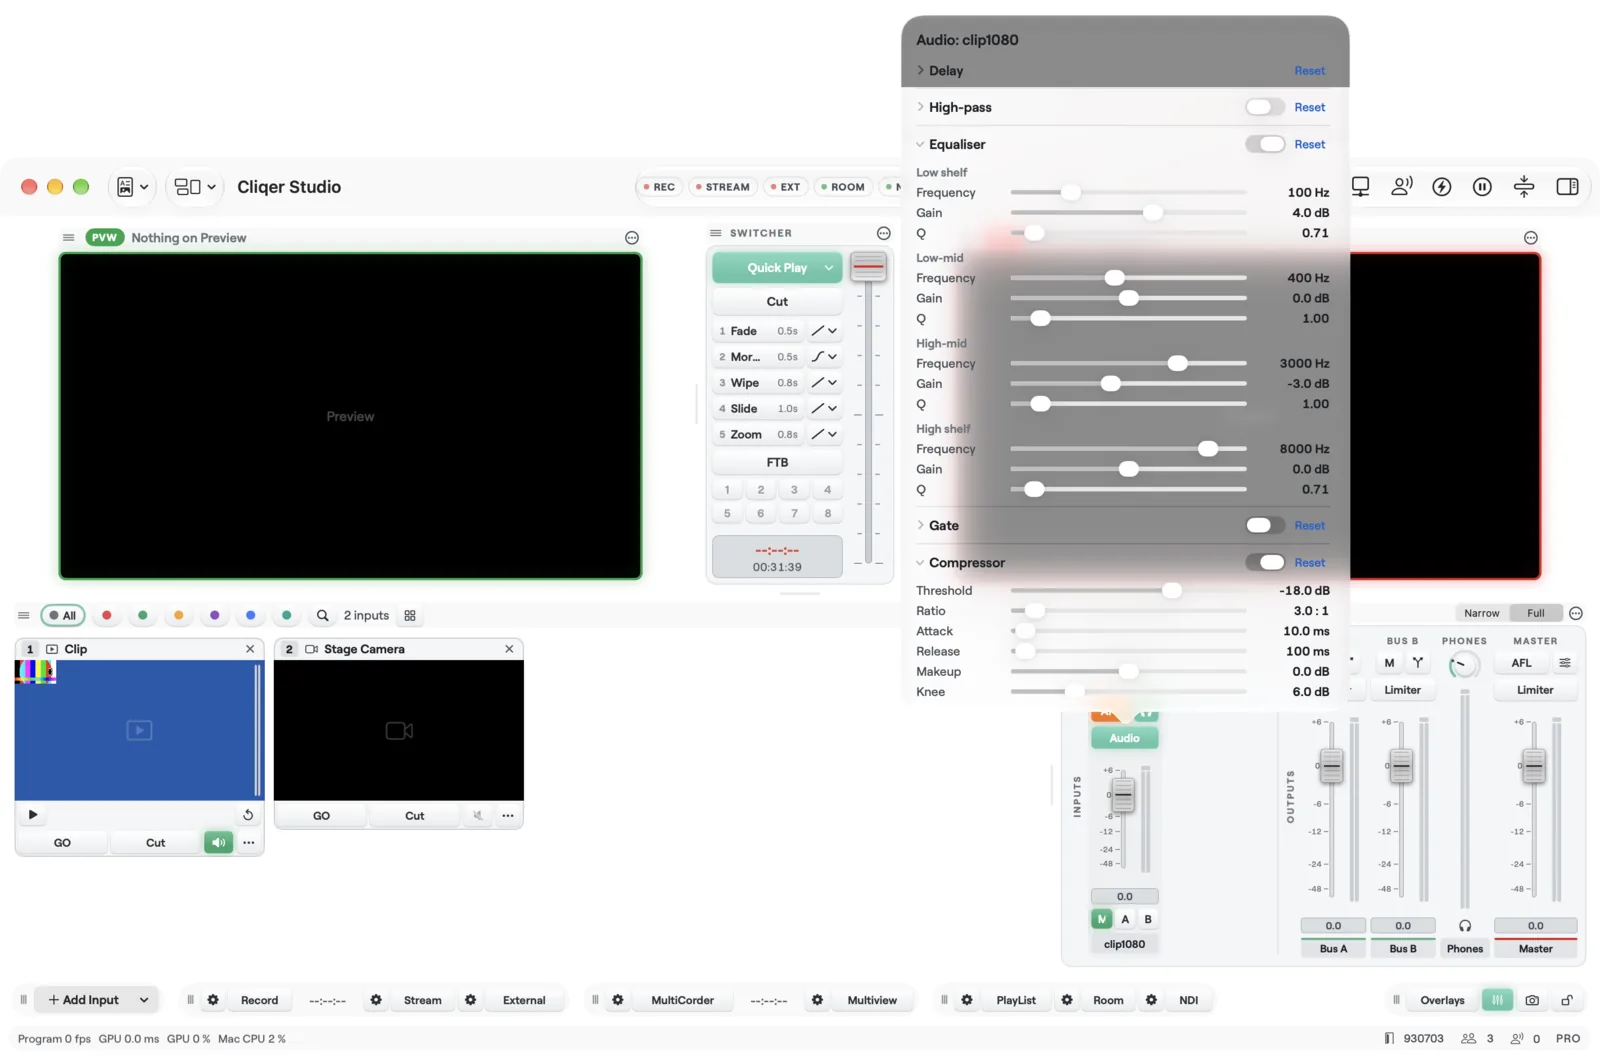
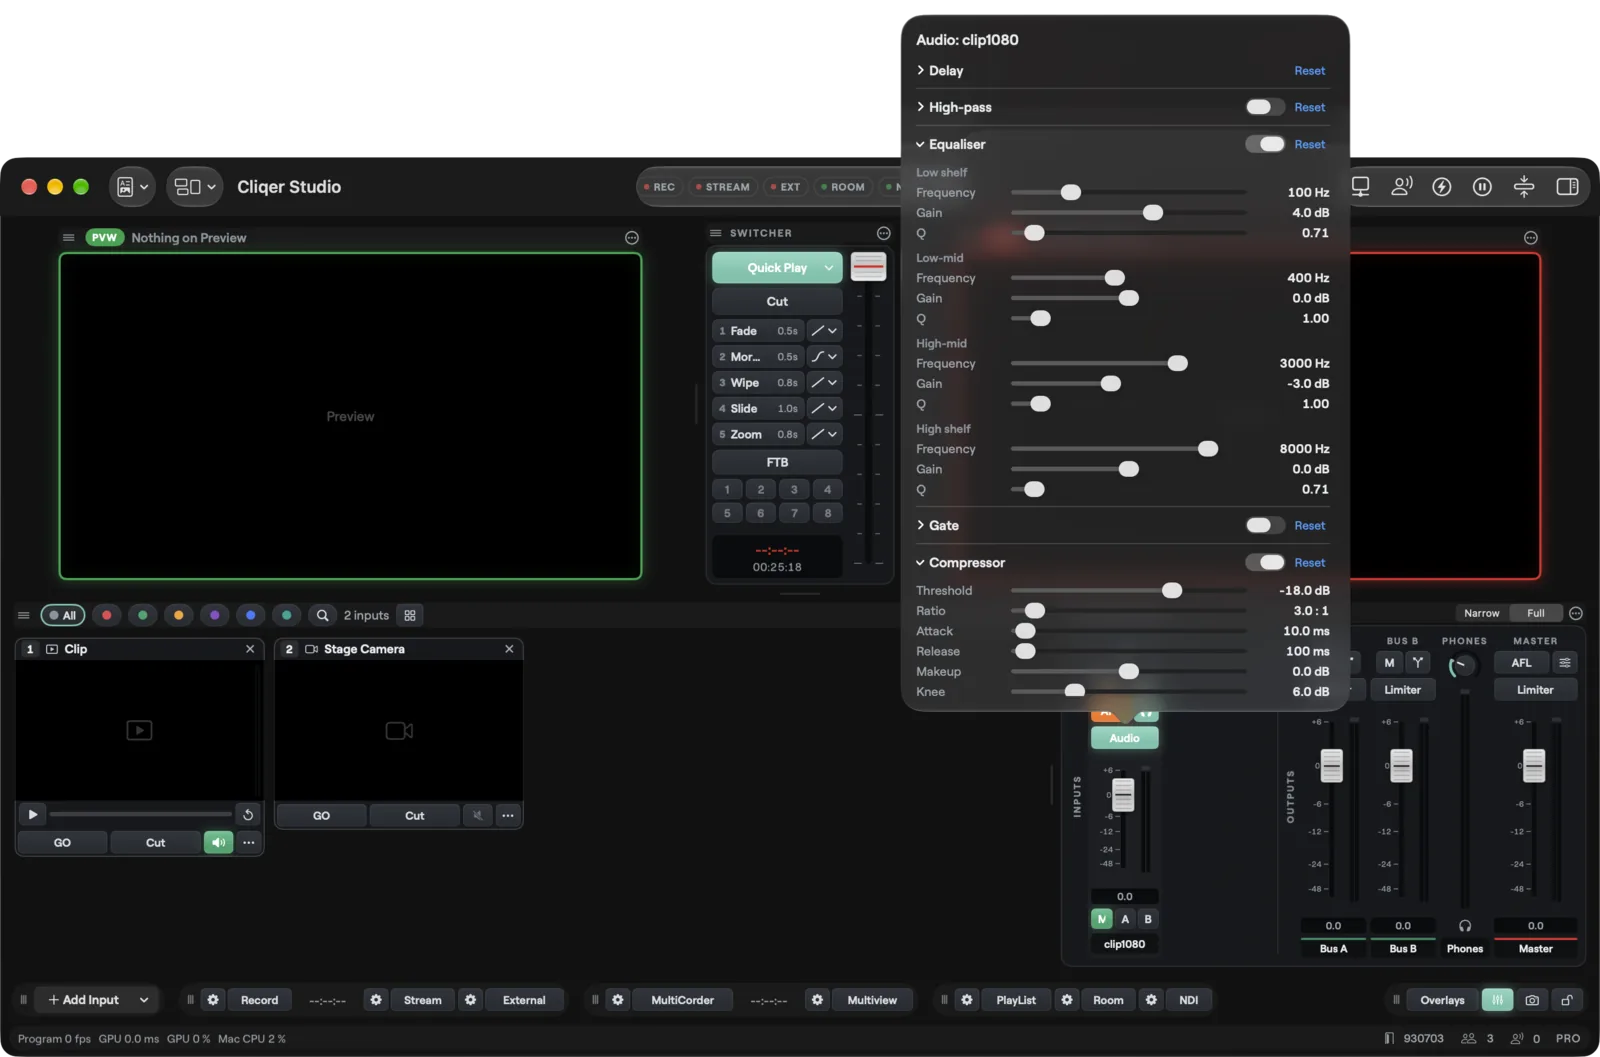
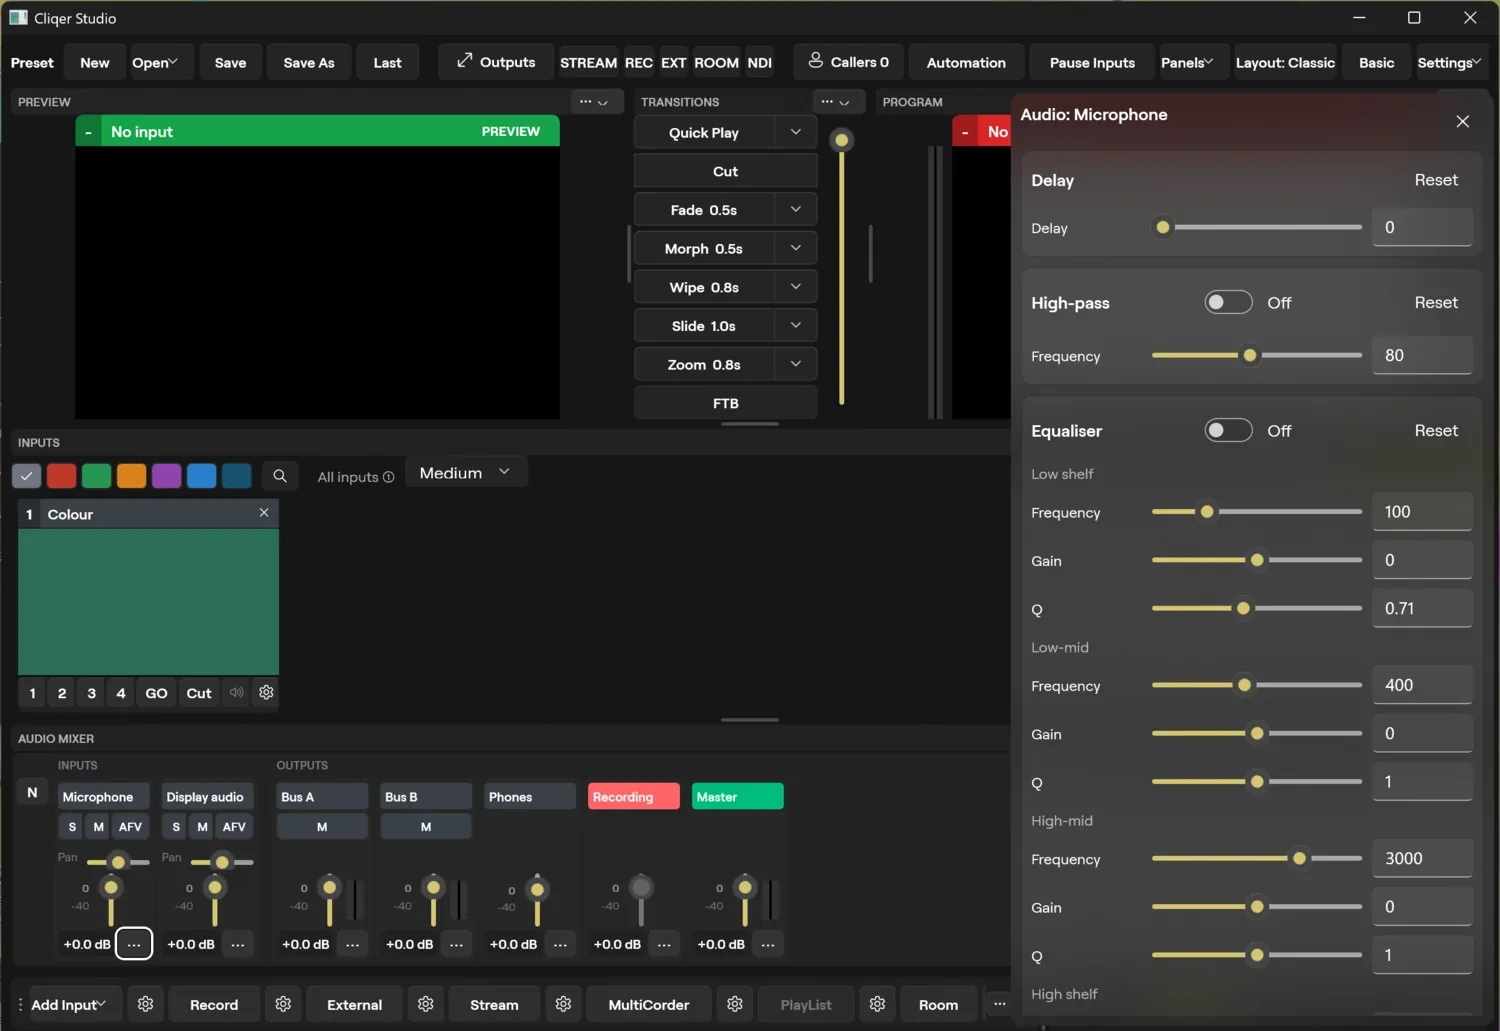
Each input strip can shape its sound before the fader. Open the panel with the strip's Audio key (macOS, a popover titled "Audio: name") or Audio processing... in the strip menu (Windows, a side card). On macOS the key is lit while the processing changes the sound. The sound passes through the sections in this order: delay, high-pass, gate, equaliser, compressor, then the fader. Every section has a Reset button and, except Delay, an on switch.
| Section | Controls |
|---|---|
| Delay | 0 to 1000 ms, to line the sound up with a picture |
| High-pass | Frequency, 20 to 400 Hz |
| Equaliser | Four bands, Low shelf, Low-mid, High-mid and High shelf, each with Frequency (20 Hz to 20 kHz), Gain (-18 to 18 dB) and Q (0.1 to 10) |
| Gate | Threshold and Range (-96 to 0 dB), Attack (0.1 to 500 ms), Hold (0 to 2000 ms) and Release (1 to 5000 ms) |
| Compressor | Threshold (-60 to 0 dB), Ratio (1 to 32), Attack (0.1 to 500 ms), Release (1 to 5000 ms), Makeup (Make-up gain on Windows, -24 to 24 dB) and Knee (0 to 24 dB) |
Audio processing is part of the Pro audio plan feature. Without it the panel says so and you can only switch processing off.
Bus limiters
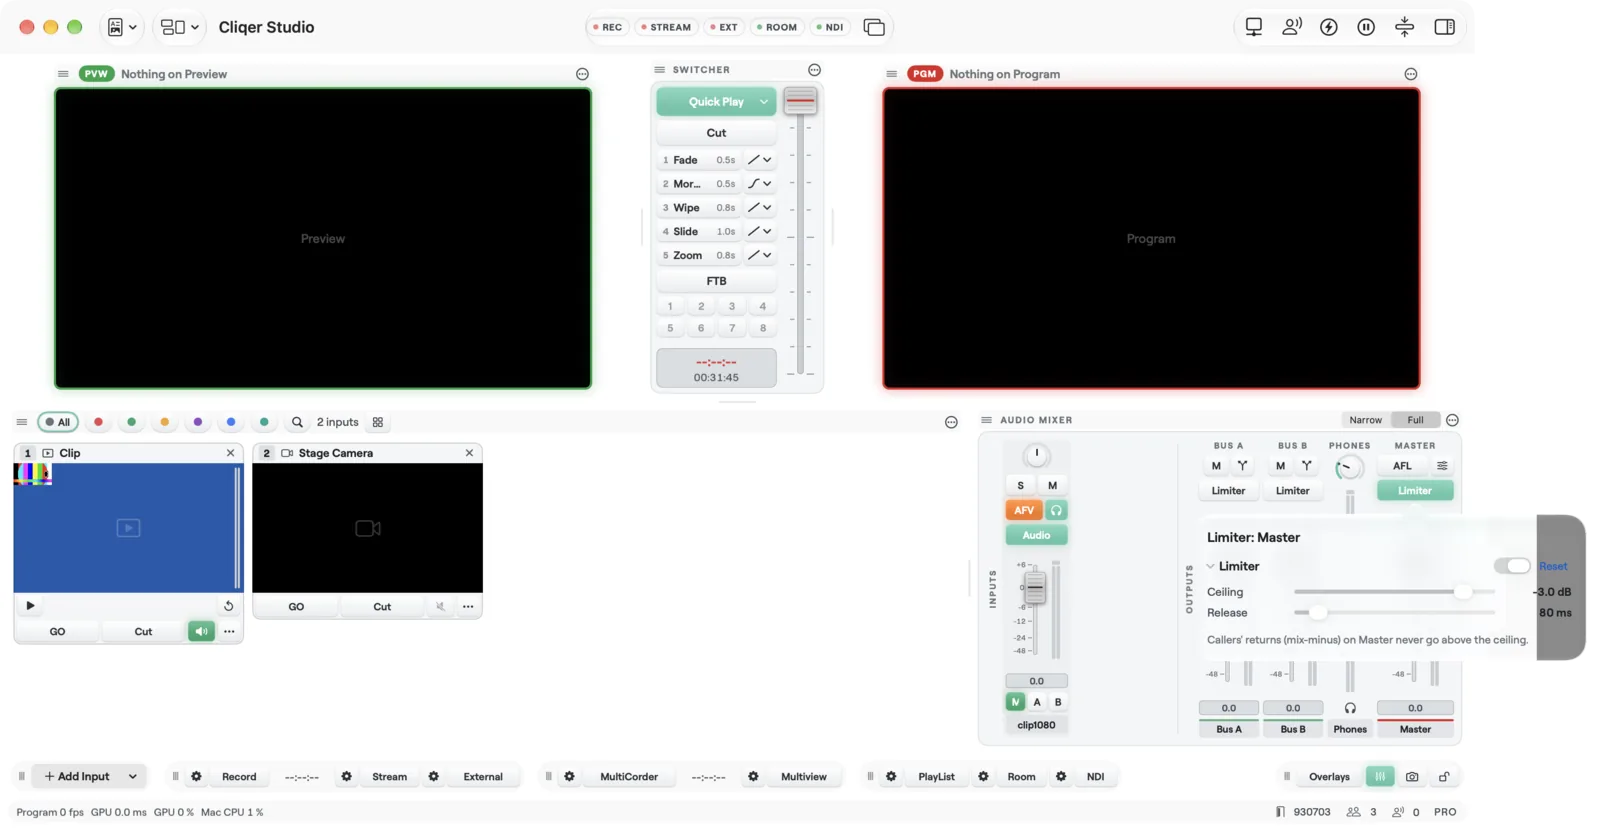
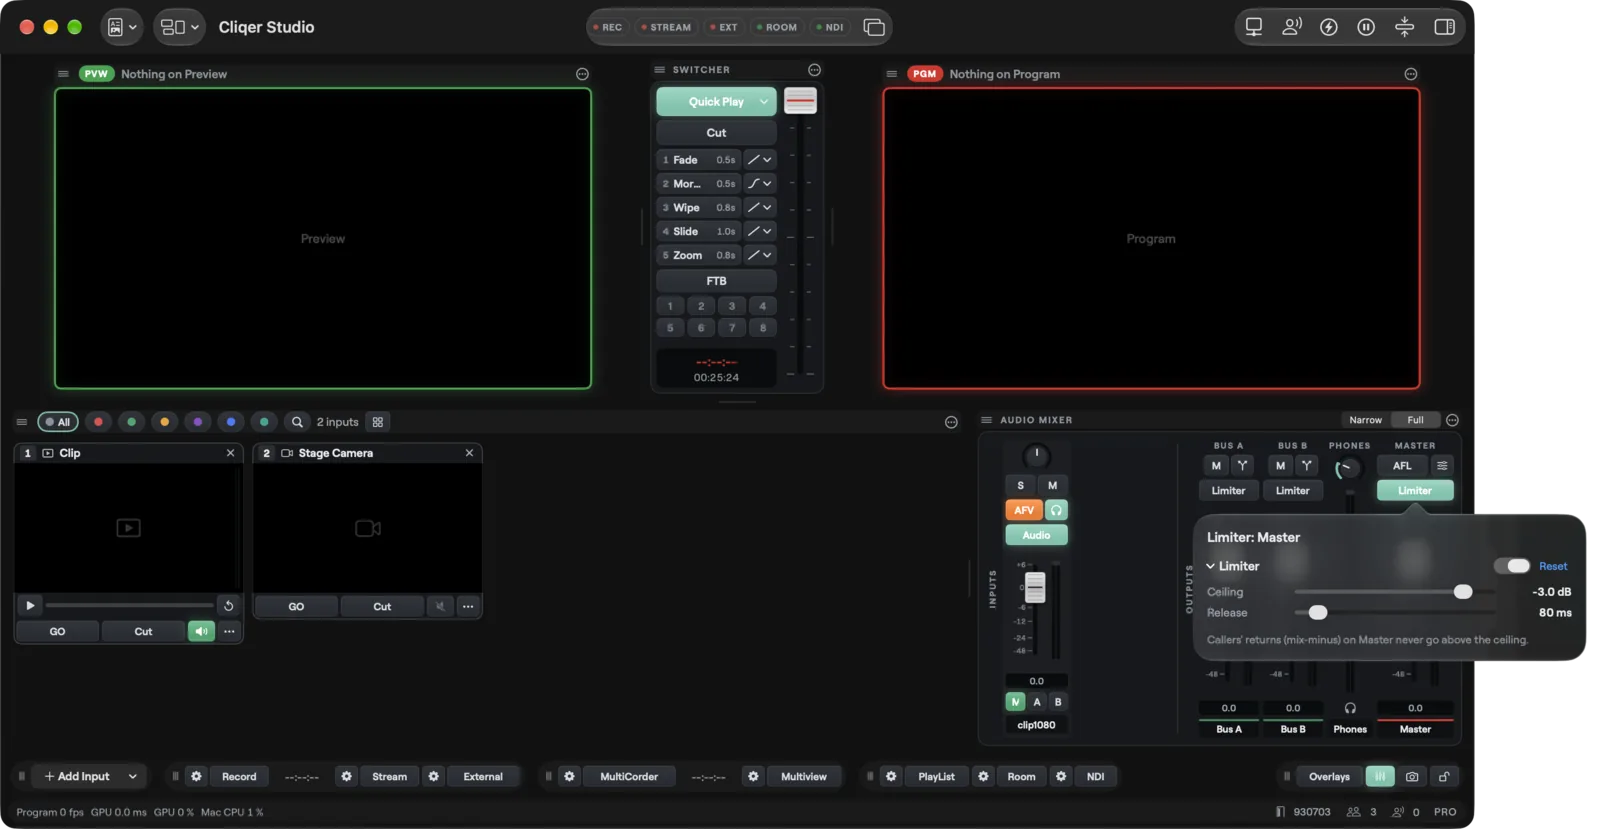
Master and every bus, Group or Return, each have a limiter that stops the level going above a ceiling. On macOS use the Limiter key on the strip (full strips only). On Windows choose Limiter... in the strip menu. The panel has an on switch, Ceiling (-24 to 0 dB) and Release (1 to 1000 ms). The returns of video call guests (mix-minus) on a bus never go above that bus's ceiling, and a guest's Return limiter row in their settings opens the same panel.
Faders and meters
- Faders run from silence up to +6 dB. Unity (0 dB) sits three-quarters of the way up. The scale marks are +6, 0, -6, -12, -24 and -48. The readout under the fader shows "-∞", "0.0" or a value such as "+3.0".
- Drag relative to where you grab, so the cap does not jump. Click in the slot to jump there. Double-click to return to 0 dB.
- Knobs (pan, headphones) drag vertically; hold Option for fine control; double-click resets.
- The meter reads dBFS from -60 to 0. Green runs to -18, amber to -6, red above. A thin line holds the peak for 1.5 seconds. A clip light stays on for about 2 seconds after a peak at full scale. Click a meter to clear the light and held peaks.
- Faders are linear in dB from -60 up to +6, with a bottom stop of silence. The maximum gain is 2.0 (+6 dB). Unity is about nine-tenths of the way up. Use Unity gain (0 dB) in the strip menu to return to unity.
- The Phones fader goes up to +12 dB.
- Each fader has a level bar beside it.
Groups and Returns
A bus is a place strips send sound to before it reaches the room. There are two kinds.
| Group | Return | |
|---|---|---|
| What feeds it | Strips you assign with a key. Each assigned strip goes in at full level | Strips you send with a knob. Each strip has its own send level |
| Where it goes | Nowhere by itself. Its Feed key puts it into Master. You can also choose it for the room, an NDI output, a router output or a guest's return | Always into Master |
| Offered as an output choice | Yesby its name | No |
| Use it for | Sub-mixes, for example Music, or a separate mix for NDI | Effects and shared sends, the way a return works on a mixing desk |
Both kinds have a fader, a mute, a meter and a limiter. The names appear everywhere a bus is chosen, so a Group called Music is listed by that name in the room picker, the NDI audio picker, the router and a guest's Return audio. Master, the headphones mix and Silence are listed too.
Add, rename and remove buses
- The + key in the mixer header (tooltip "Add a bus or a return") opens a menu: Add Bus (a Group) and Add Return. A new bus is named with the first free letter, for example Bus C or Return A.
- Rename: double-click the bus's name plate and type, or right-click and choose Rename. Press Return to keep the name or Esc to cancel.
- Reorder: drag a blank part of the strip, or right-click and choose Move Left or Move Right. The menu also moves the bus in the show's bus order, which is the order External Control sees.
- Duplicate: right-click and choose Duplicate. The copy sits right after the original and is named "
copy" (" copy 2", " copy 3" while that name is taken). It takes the original's kind, fader, mute, Feed setting, audio processing and limiter, and every send into the original: each strip that sends to it, and the caller template, sends to the copy at the same level and pre or post setting. Whatever listens to the original, such as the room, an NDI output, a router output or a guest's return, keeps listening to the original. - Delete: right-click and choose Delete. It is the last item in the menu.
- Every one of these is one step in Edit > Undo.
- The + Bus key (tooltip "Add a Group bus") and the + Return key (tooltip "Add a Return bus") in the mixer header add a bus at the end. The names are the first free letter, for example Bus C or Return A.
- Right-click the bus's name for its menu: Rename... (the name box opens on the strip), Duplicate, Move left, Move right and Delete bus. A Group's menu also has Feeds Master, checked while the Group runs into Master. Dropping one Group on another Group, or one Return on another Return, moves it.
- Duplicate: right-click the bus's name and choose Duplicate. It does the same as on the Mac: the copy sits right after the original, is named "
copy", and takes the original's kind, fader, mute, Feed setting, audio processing, limiter and every send into it. The outputs stay on the original. - Each of these is one undo step.
Bus A and Bus B are ordinary Groups. You can rename, move and delete them like any other bus. Shows saved before buses could be added open with Bus A and Bus B as they were.
What deleting a bus does
Its strip goes, and so does every send to it. Anything that listened to it, the room, an NDI output, a router output or a guest's return, carries Master instead, and Cliqer says Bus Removed: "Outputs that used
Sends
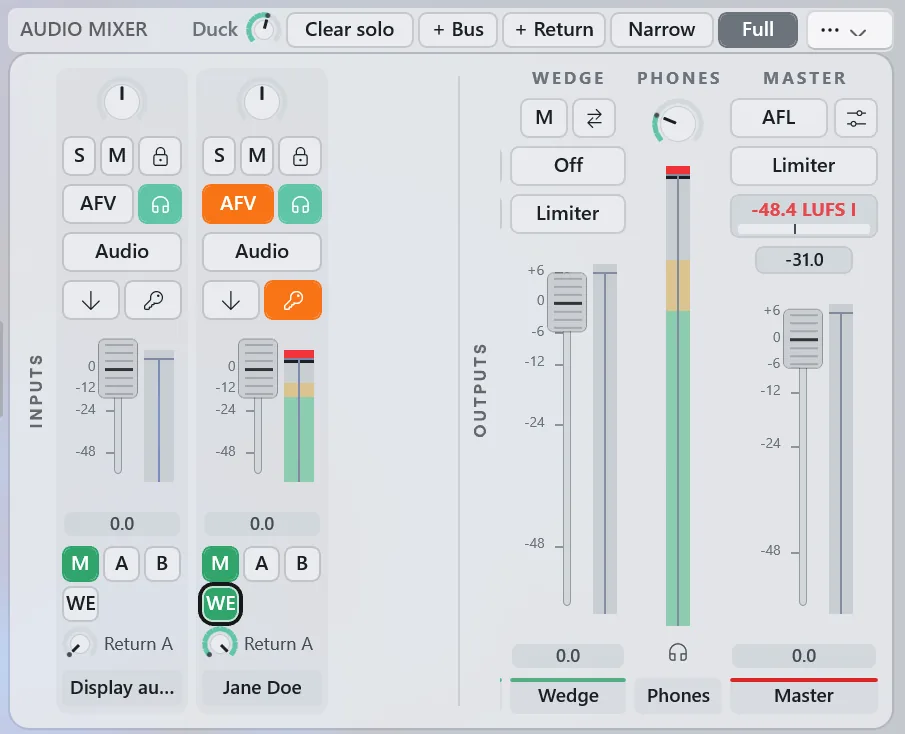
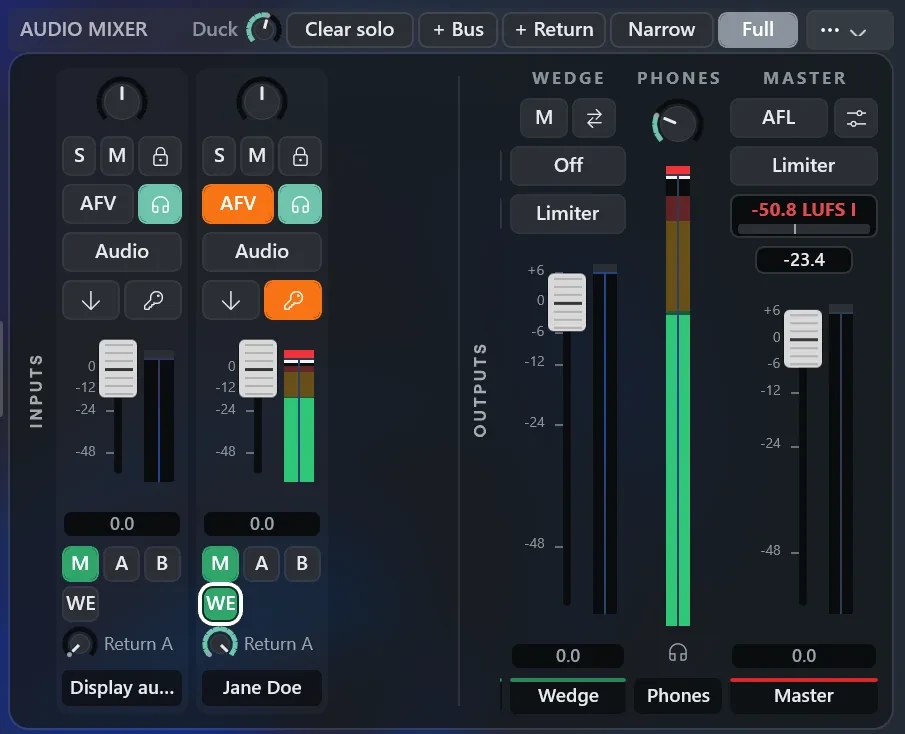
An input strip sends to Master, to Groups and to Returns.
- M (tooltip "To Master") sends the strip to Master.
- Each Group has a key on the strip, lit while the strip is assigned to it. The key shows a short form of the name ("A" for Bus A, otherwise the first two letters or two initials); the tooltip reads "Send to
". Click to assign or remove. - Each Return has a small knob with the bus name under it and its level beside it ("off", or a value such as "-6.0"). Drag to set the send level; dragging it to 0 removes the send. Option-click the knob switches the send between after the fader (the default) and before it; a send before the fader is tinted amber.
- A narrow strip has one Sends key (tooltip "Sends of
"). Its menu has a check item for each Group, and a submenu for each Return with Off, -12 dB, -6 dB, 0 dB, +6 dB and Before the fader. - The sends area of a strip scrolls when there are more buses than fit.
- M sends the strip to Master. Each Group has a key, lit while the strip is assigned to it, and each Return has a small knob with its level.
- Ctrl-click a Return's knob to switch the send between after the fader and before it. A send before the fader draws its arc in orange.
- On a narrow strip, and on any strip, the strip menu Send to lists Master, a check item for each Group, a submenu for each Return with levels and Before the fader, and Headphones.
- The sends block is three rows tall and scrolls when there are more buses.
Each strip sends to a bus once: setting a bus again changes its level. Sends are part of the show, with the strips' other settings.
Phones and Master
- A Group strip has a mute M (tooltip "Mute
"), a routing key (tooltip "Send to the room") with the choice Send to Room , a Feed key (tooltip "feeds Master: on" or "off"), a Limiter key (hidden in narrow strips) and a fader. A Return strip has the mute, the limiter and the fader. Checked on the routing key means the room currently hears this bus. - Phones has a round knob from 0 to 400 per cent, 100 per cent by default (double-click to reset), a meter and a headphones icon. It sets the level of the headphones mix.
- Master has a fader, a meter, a Limiter key (hidden in narrow strips) and two buttons:
- AFL or PFL (tooltip "Solo listens after the fader (AFL) or before it (PFL)"). Click to toggle.
- A settings menu (tooltip "Mixer settings: microphone mode, what room hears"). It starts with a line that says which microphone mode is in use, for example "Standard mic mode" or "Voice Isolation active". Then Microphone Mode... opens the system microphone mode picker (it is there only when the system has a picker), and Room Hears offers Master, Headphones Mix, every Group by name and Silence.
- The Room key in the bottom bar opens the same Room Hears choice from its cog or right-click. An NDI output chooses its sound in the Audio setting of its row in the Outputs window (Off, Follows the source, Master, Headphones mix, or a Group by name).
- Every bus has a mute M and a fader, and a limiter in its menu (Limiter...). A Group's menu has Feeds Master, checked while the Group runs into Master.
- Phones and Master have faders and meters.
- Right-click a strip's name for its menu. On Master it holds The room hears, which lists Master, the headphones mix, every Group by name and silence; on a Group it holds Send
to the room . An NDI output, a router NDI or DeckLink audio output and a guest's return choose a bus by name in their own settings. Windows has no microphone mode picker in the mixer; the Echo cancellation row in Settings > Audio shows the echo cancellation status, for example "Windows echo cancellation active".
Master and every bus run at up to +6 dB. On Windows Master and Phones have no mute button: use the fader.
Guest strips and timeline strips
- Guest strips. The strip of a guest on a video call remembers how you set it. The strip you changed last becomes the template, and the next guest's strip starts from it. A solo-only change does not count. The template is saved with the show and an undo restores it.
- Timeline strips. A clip track in the timeline editor has its own strip. Its M is the track's own mute: it turns that track's sound off in the timeline and is not a second mute in the mixer.
- The whole mixer is saved with the show: the buses, every strip's sends and settings, the Master fader and limiter and what the room hears.
Microphone and speakers
The microphone and speakers that the mixer opens are chosen in Settings > Audio (Microphone and Speakers, with "System default"). See Settings.
Video calls
Each guest on a video call is an input with its own strip. What a guest hears back is set in that guest's input settings (Return audio): Master, Headphones or any Group by name (Bus A and Bus B to start with). Whichever you choose, the guest hears that bus without their own voice, so there is no echo. Returns are not offered. Choosing a Group needs the bus feature in your plan.
Keyboard
- M turns audio on or off for the selected input (both platforms).
- The solo, mute, AFV and fader of a strip can be bound to keys, MIDI or OSC on macOS: right-click the control and choose Assign Shortcut, MIDI or OSC... (see External Control). On Windows the strip menu has the same item for that strip's mute.
Transitions
How Preview and Program work, and every way to take a source live in Studio: Cut, Quick Play, numbered transitions, the T-bar, stingers, overlays and Fade to Black.
Outputs
Send the Studio Program to the room, to NDI, to a recording, to a live stream, to displays and capture cards and to other apps as a camera, and record every input to its own file.