Screens and Mix
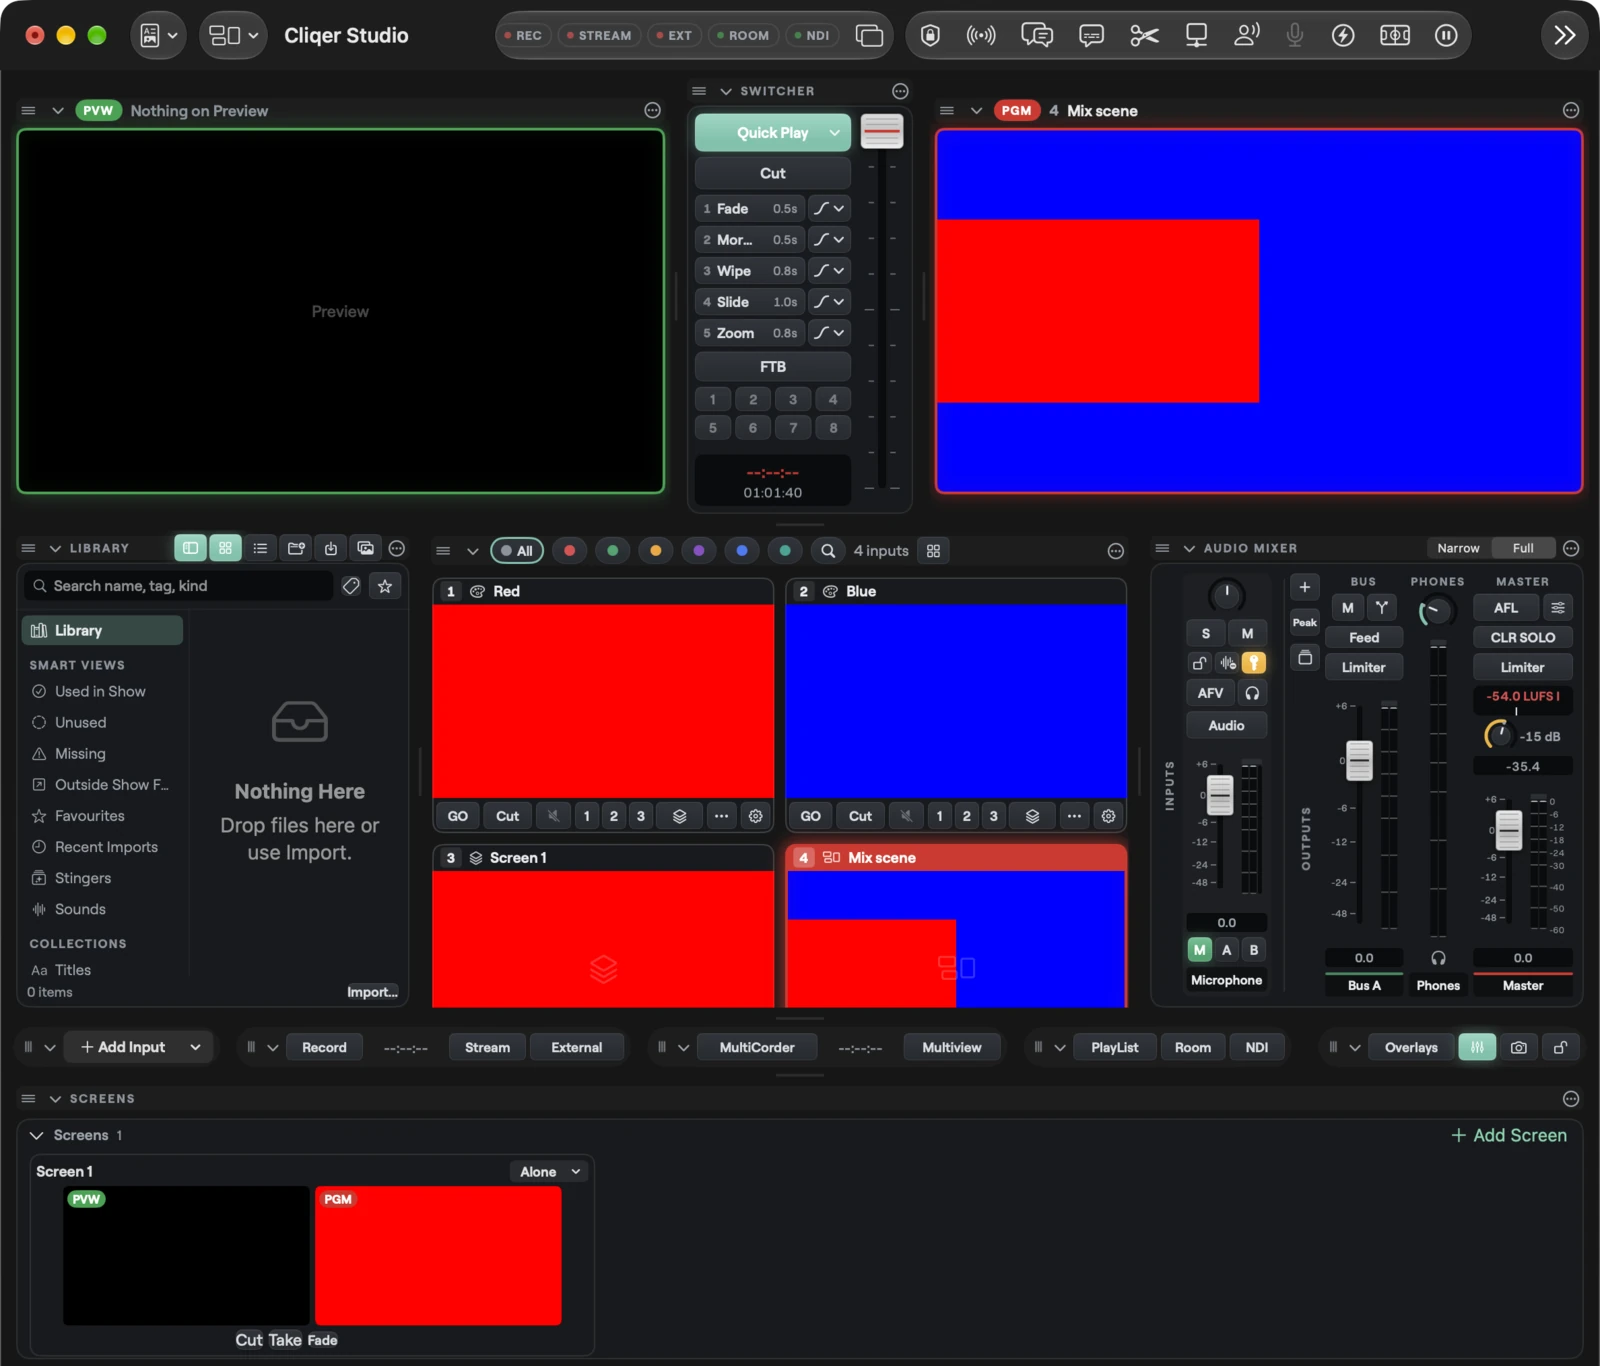
A Screen is a second (third, fourth...) switcher of its own. It has its own Preview, its own Program, and its own Cut and Take. The main Preview and Program you already know stay as they are. Screens sit beside them.
Use a screen for a picture that has to change on its own schedule: a confidence monitor, a timer for the stage, a side screen, one quarter of a 4K wall. Then use Mix to put a whole screen back into the show as an input.
Command. Where Windows differs it says so, and Windows and macOS lists every difference.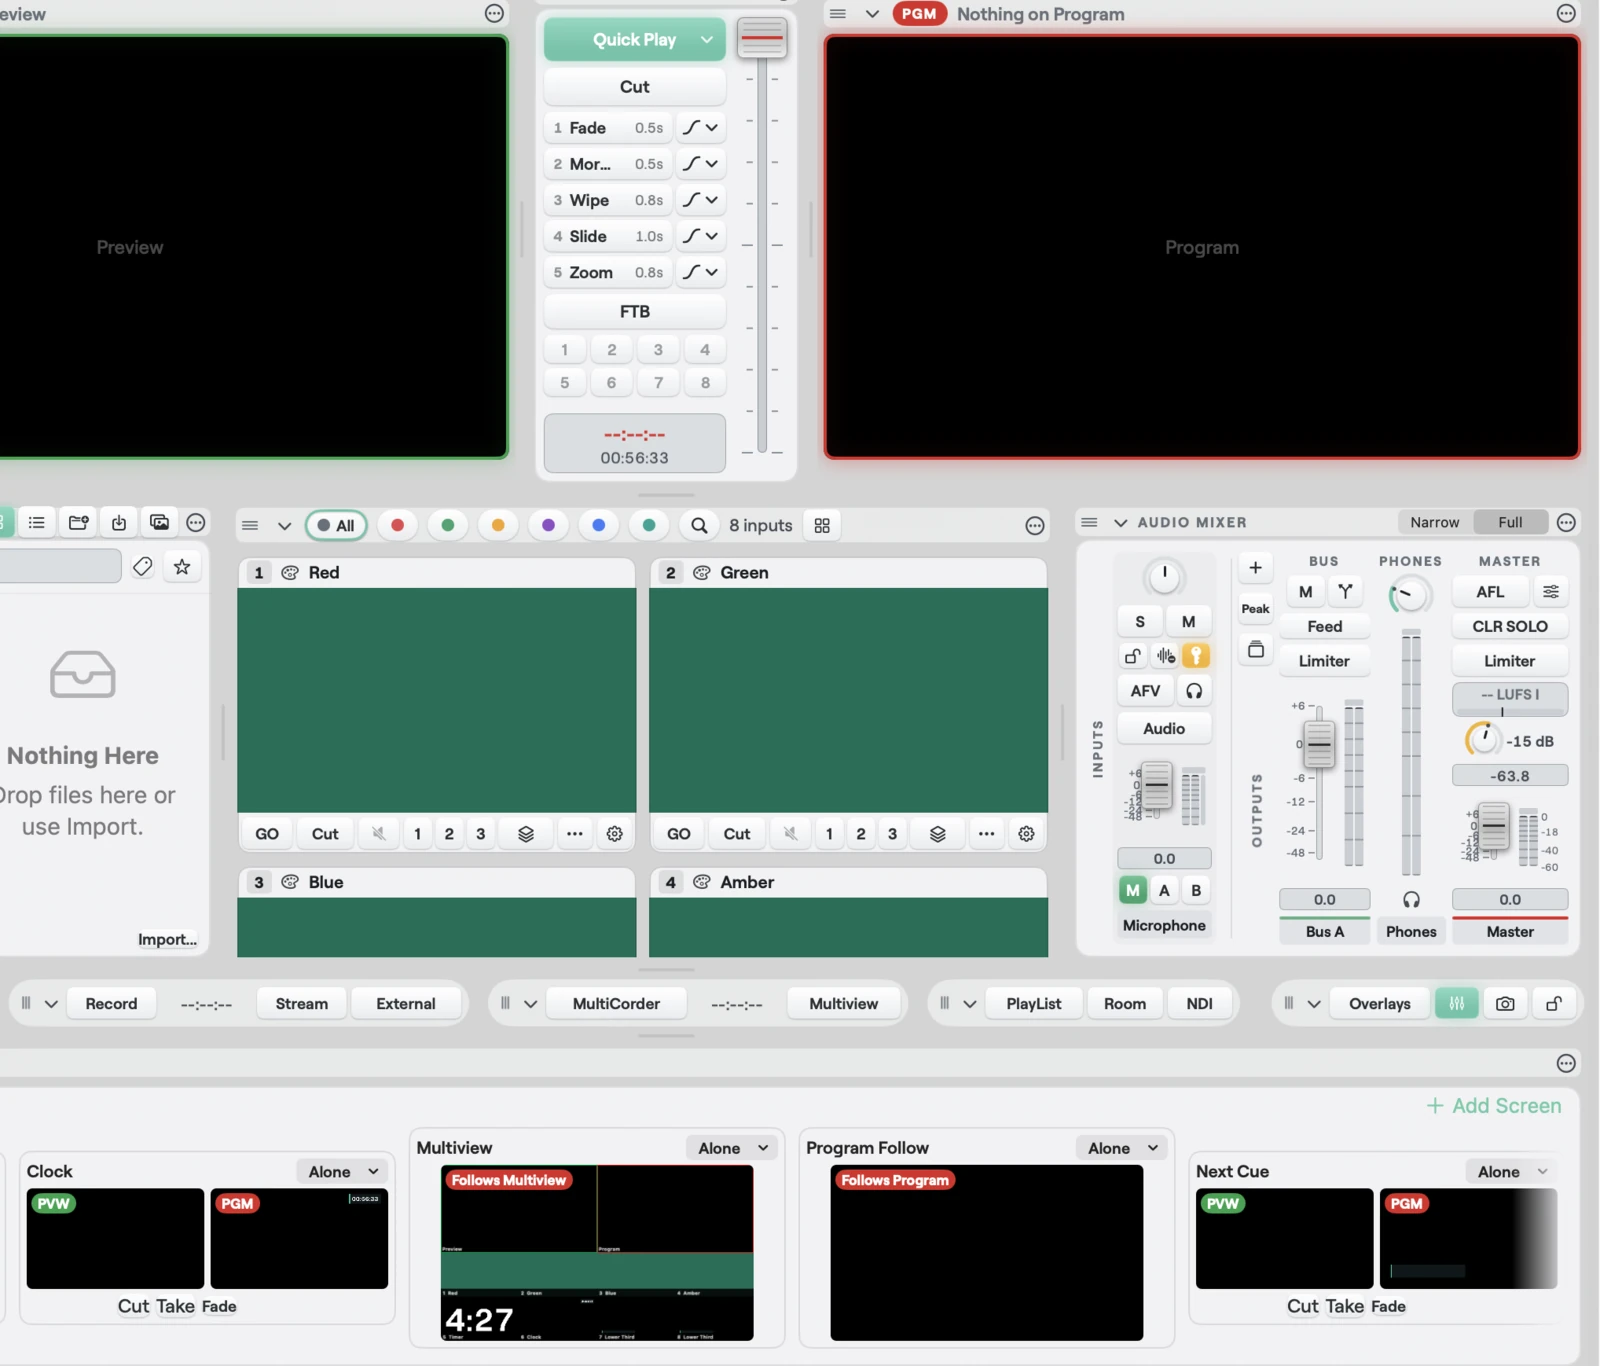
What a screen is
- It is a bus: a Preview and a Program that work like the main ones. Pick an input to put it on the screen's Preview, then Take to send it to the screen's Program. See Transitions.
- It has a size. A new screen is 1920 x 1080. A size has even sides from 16 to 16384 pixels, and at most 7680 x 4320 pixels (8K UHD) in all: a long strip such as 16384 x 1080 fits, a 16384 square does not. Studio refuses a size outside that. On Windows you pick the size from a list, see Windows and macOS.
- It has a name. A screen you have not named reads Screen 1, Screen 2 and so on.
- It carries picture only. A screen has no audio of its own. An output that carries a screen keeps its own audio setting.
- It has a link, which says whose Take it follows. See Link a screen's Take.
- It can instead follow a source and have no bus of its own. See Follow a source.
You can have up to 2 screens on Pro, 4 on Ultra, and 16 on Studio and Enterprise. See Plan.
Add, name and remove a screen
Add a screen from any of these:
- Add Screen (the plus) at the right of the Screens strip under the Preview and Program panels. Choose Screen.
- Add Screen or Canvas in the footer of the Screens view of the Outputs window. Choose Screen. The Outputs window has three views at the top: Outputs, Router and Screens. See Outputs window.
- Add Screen in the Layer menu, while the Screens view is open.
The new screen is selected. The strip opens if it was collapsed and scrolls to the new card. In the Screens view its settings open on the right:
| Setting | What it does |
|---|---|
| Name | The screen's name. Leave it empty to read Screen 1 and so on |
| Width, Height | The screen's size in pixels. Press Return to apply |
| Link | Alone, Main or Group 1 to Group 8 |
| Shows | Its own bus, or Follows a source. See Follow a source |
At the top of the settings a live picture of the screen shows, with the badges PVW and PGM side by side. A screen that follows a source shows one picture, badged Follows and the source's name.
Each row of the list shows the name, the size and what the screen shows (the input on its Program, or Black), with its link on the right.
To remove a screen, select it and click the minus at the foot of the list, or press Delete. The plus-square next to it duplicates the selected screen (the copy is named "
Right-click a screen or canvas row for Duplicate, Link and Remove.
Collapse the screen strip with the arrow at its left. The strip header counts the screens, or reads None yet.
Add a screen from any of these:
- Add screen (the plus) at the right of the strip under the panels. Choose Screen. The strip shows only while the show has a screen, so add the first one another way.
- Add screen or canvas (the plus) at the foot of the list in the Outputs window, section Screens and canvases. Choose Screen.
- Add Screen in the Layer menu.
The new screen is selected. The strip under the panels opens if it was folded and scrolls to the new card. The strip appears as soon as the show has one screen, and goes away when it has none.
Select a screen in the list to open its settings:
| Setting | What it does |
|---|---|
| Name | The screen's name. Leave it empty to read Screen 1 and so on |
| Raster | The screen's size in pixels, picked from a list: 1920 x 1080, 1280 x 720, 3840 x 2160, 1080 x 1920, 1080 x 1080 or 1920 x 540. A size set another way shows as an extra entry |
| Link | Alone, Main or Group 1 to Group 8 |
| Shows | Its own bus, or Follows a source |
At the top of the settings a live picture of the screen shows, labelled Preview and Program. A screen that follows a source shows one picture, labelled Follows and the source's name.
To remove or duplicate the selected screen use Remove selected screen or canvas and Duplicate selected screen or canvas at the foot of the list. Ctrl+D in the Outputs window duplicates the selected screen too. Right-click a screen or canvas row for Duplicate, Link and Remove; Delete removes the selected row.
Studio refuses to remove a screen in two cases:
- An output still carries the screen. Studio names the output. Route it somewhere else first.
- A Mix shows the screen. Studio shows the notice Screen In Use: "A Mix input shows this screen. Remove the Mix input first, then delete the screen." Remove the Mix input, then the screen.
A screen is saved with the show. A show that holds screens opens only in a version of Cliqer that knows about them.
The Screens strip
The strip is a panel like any other. By default it is the full-width row at the bottom of the Studio window, and it has one card per screen. You can dock it in any slot, float it and bring it back (Layouts). Its cards follow the space it has: in a space wider than tall they are a row that scrolls sideways, in a taller space they stack and scroll up and down. A saved layout from an earlier version opens with the strip as the full-width bottom row.
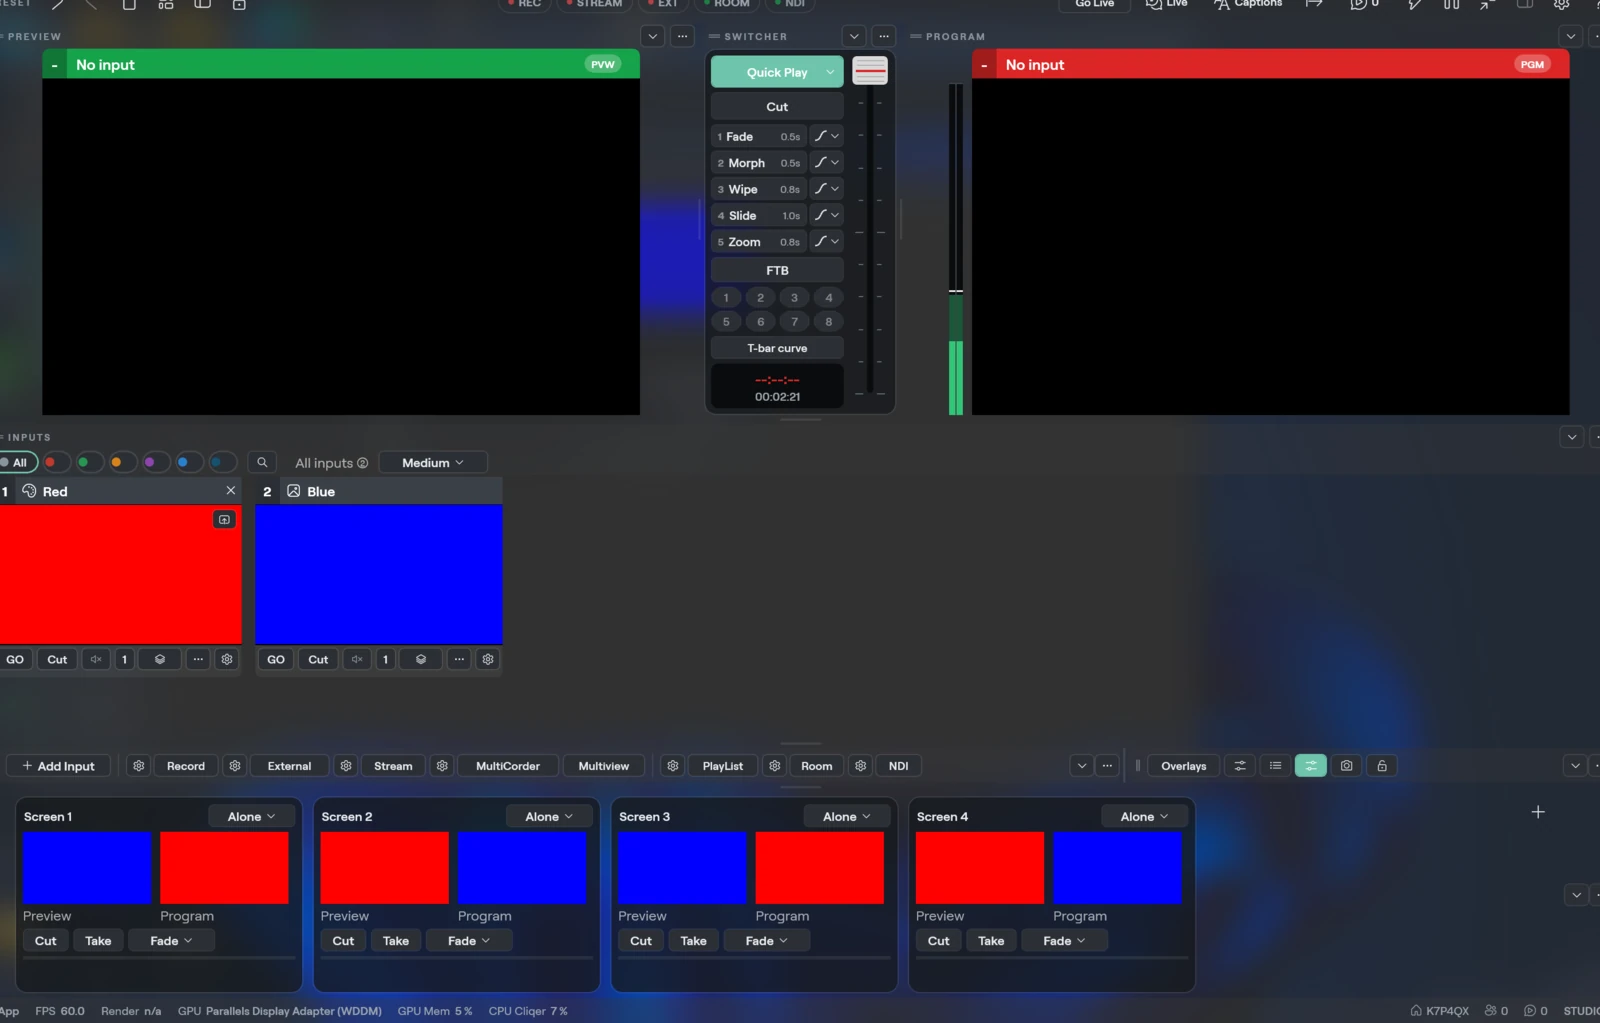
Each card shows the screen's name, its link chip, a small PVW picture and a small PGM picture, Cut, Take, and the progress of a running transition as a percentage. With more screens than fit, the strip scrolls sideways.
Each card shows the screen's name, its link, a small Preview picture and a small Program picture, Cut, Take with a menu for the other transition slots, and a progress bar for a running transition.
Preview then Take on a screen
A screen follows Preview then Take like the main bus.
- Click a card to arm it. Its border lights.
- Click an input. The input goes to the Preview of the armed screen. Nothing reaches that screen's Program yet.
- Press Cut on the card to send Preview to Program at once, or Take to send it with the screen's transition.
Click the armed card again to disarm it, and clicks on inputs go to the main Preview again (macOS).
Take on a card uses the first transition slot. On the Mac, the small menu on Take picks any other slot. On Windows, use the chevron next to Take. The slots are the same numbered transitions as the main switcher.
A Morph slot morphs on a screen like it does on the main Program: the layers that the screen's Preview and Program scenes share move from where they are to where they will be. It does not fall back to a fade.
A scene, title or timeline on a screen's Program obeys Edit Live like one on the main Program. With Edit Live off, your edits wait in Preview. A Take on any bus that shows the input airs the waiting edit, and every other bus that shows the same input airs it again in the same step with the transition it came in with.
Link a screen's Take
The link on each card (and in the screen's settings) says which Takes go together.
| Link | What it does |
|---|---|
| Alone | The screen takes on its own. This is the default |
| Main | The screen follows the main bus. A Take on the main Program also takes this screen, and the main T-bar and FTB move it too. Only a screen that has something on its Preview takes part |
| Group 1 to Group 8 | A Take or Cut on one screen of the group takes every screen of the group that has a Preview armed. If none has, Studio refuses with the no-Preview notice |
Overlays stay on the main bus only.
Follow a source
A screen can show a source and nothing else, with no Preview, no Program and no Take. In the screen's settings pick Shows > Follows and choose what it mirrors: Program, Clean Program, Preview, Multiview, or any input. Pick Its own bus to give it a bus again.
On the strip a follower card shows one picture, labelled Follows and the source's name, and has no Cut or Take. Studio refuses Preview on a follower.
A screen cannot follow another screen, an output canvas or a Mix.
Comfort screens
A comfort screen is a one-click screen for a monitor that backstage people look at. Each makes one Alone screen that follows or shows a ready-made source.
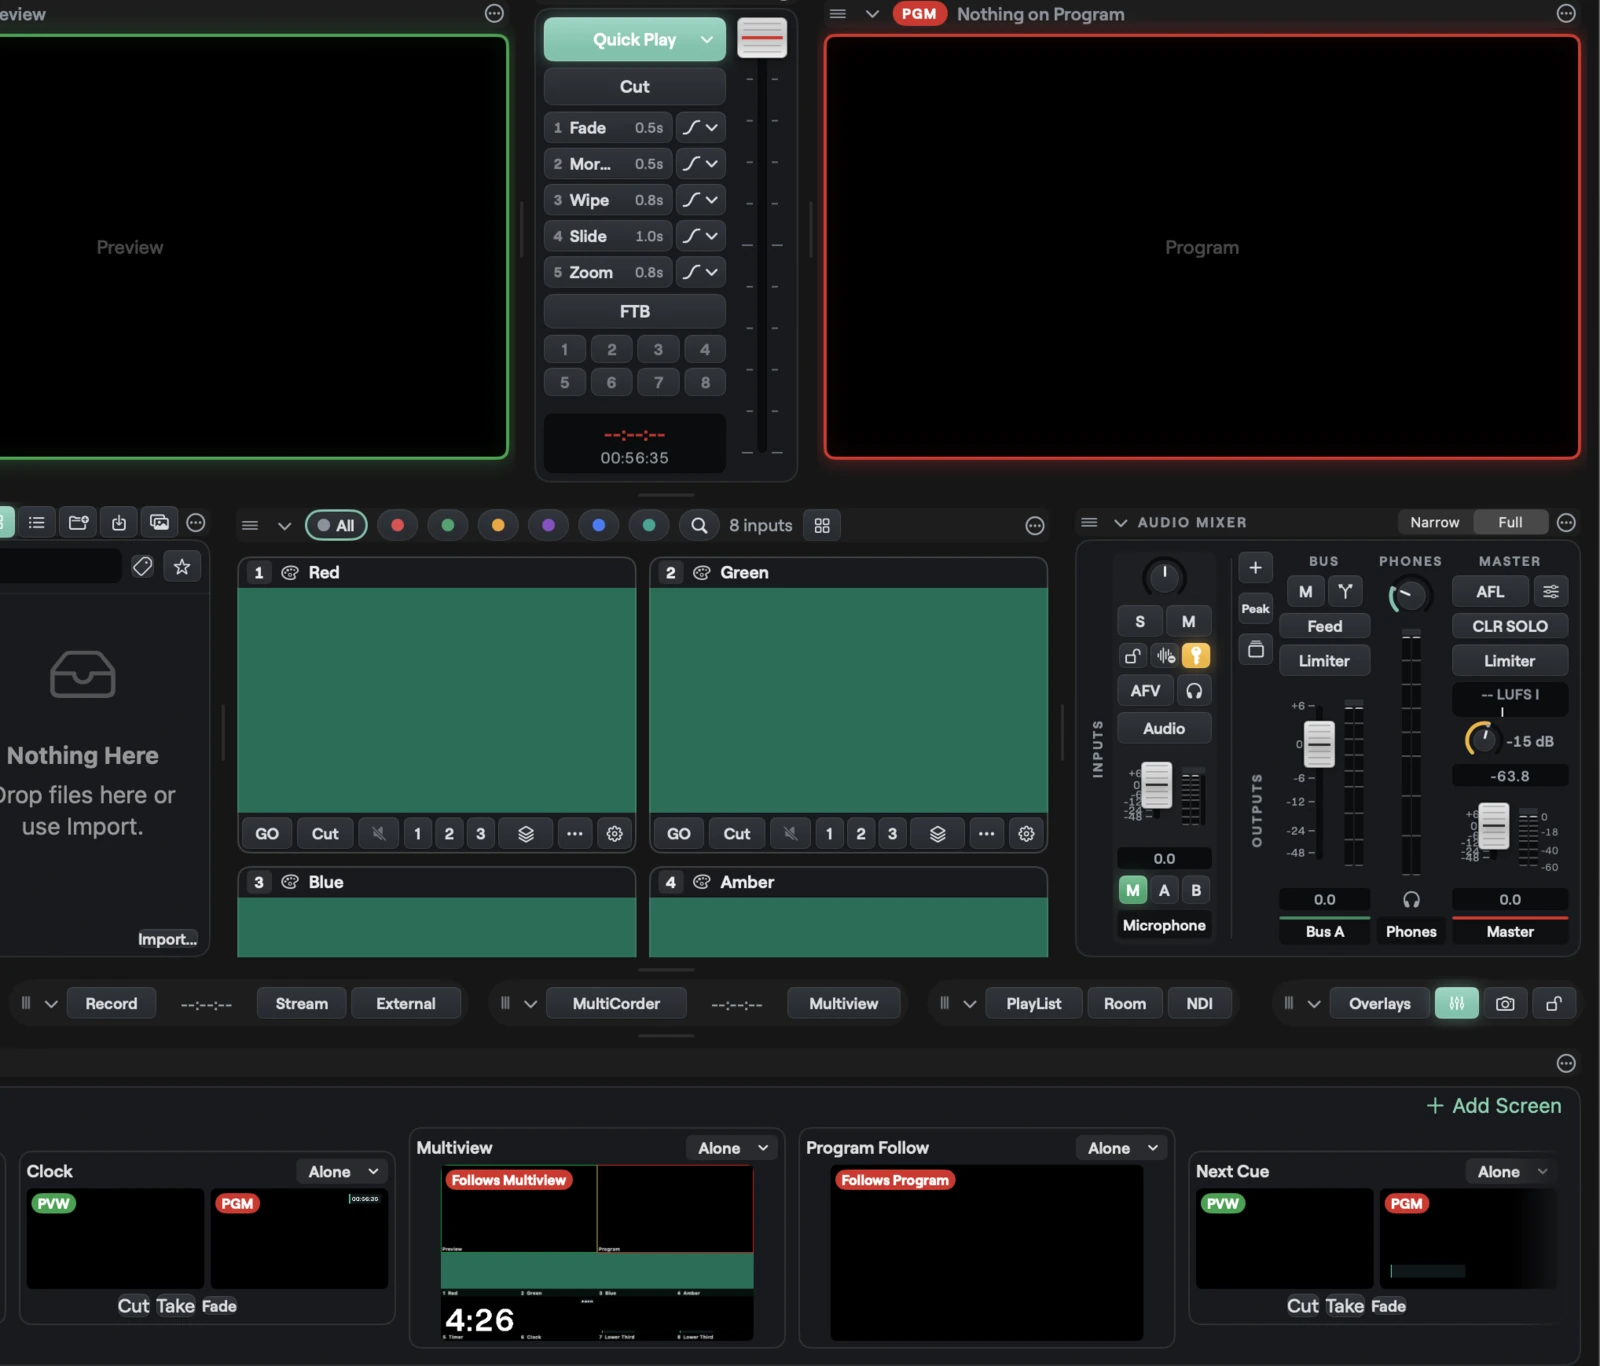
In the add menu (Add Screen on the strip, Add Screen or Canvas in the Outputs window), section Comfort Screens: Timer (a Timer title with its own clock, 5:00 to start, see Timer titles), Clock (a time of day title), Multiview, Program Follow and Next Cue. Next Cue opens a list of your timeline inputs and shows that timeline's current and next cue on a title. When you have no timeline its list holds one greyed row, Add a timeline input first.
In the add menu (Add screen on the strip, Add screen or canvas in the Outputs window): Multiview screen, Program Follow screen, Timer screen, Clock screen, and Next Cue screen:
Send a screen to an output
A screen is a source like Program or an input. In the Outputs window, choose it as the source of an output:
- macOS: when you add an output, and in an output's Source list, the screens and canvases come after the inputs, below a divider. The Router matrix has a column for each screen and each canvas.
- Windows: the Router matrix has a column for each screen and each canvas, after the inputs.
A screen has no audio, so the output uses its own Audio setting.
Output canvases
An output canvas is one big fixed-size picture that holds several screens side by side. One output (an SDI or HDMI port, or an NDI sender) carries the whole canvas. A hardware splitter can then cut it up for several monitors. A new canvas is 3840 x 2160, which holds four 1920 x 1080 screens. A canvas has the same size limits as a screen: even sides from 16 to 16384 pixels, at most 7680 x 4320 pixels in all.
Add a canvas from the add menu: New Canvas... (macOS) or New canvas... (Windows), the last item, under a divider. You can also use Add Canvas... in the Layer menu. The ellipsis is there because a canvas lives only in the Outputs window, not in the Studio strip: the item adds the canvas and opens the Outputs window on it, with the new canvas selected (on macOS in its Screens view). The add menu has no Canvas item, only New Canvas.... Select a canvas in the list to edit it:
- Preset lays out a grid of screens, reusing the screens you have and adding any it needs. The list reads 1x2, 1x3, 1x4, 2x1, 2x2, 3x1 and 4x1 (columns by rows). Every cell is 1920 x 1080, so 4x1 makes a canvas of 7680 x 1080.
- Add Screen (macOS) or Add screen to canvas (Windows) puts one more screen on the canvas.
- Drag a screen to move it. Use the buttons to bring it to the front, duplicate it or take it off the canvas.
- Select a screen on the canvas to type its place. Position has the boxes X and Y (in px), Size has W and H (in px). W and H set the size of the region's screen, so its raster changes with them; a region stays inside the canvas and keeps a minimum side. Press
Returnor leave the box to apply. On macOS the lock button next to Size (help text Lock aspect ratio) keeps the shape while you change W or H; on Windows the lock sits on the Size row too. - A screen on the canvas has Luma Matte: its brightness cuts out the screens under it. Select one screen on the canvas to see its Luma Matte and its picture trim.
- Auto Blend (a switch under the editor on macOS, in the Canvas section on Windows) fades the overlap between screens: where regions overlap, the upper one fades in over the one below. It is kept per region (each region's own Blend flag, the switch sets it on every region of the canvas, and a screen added to a canvas that has the switch on blends too). A region with it on ramps only its own overlap edges, and a region with it off is drawn whole. The switch reads on only when the canvas has regions and every one blends.
To delete a canvas, select it and use the minus at the foot of the list. A canvas that is in use is not deleted at once. Studio asks first with the alert Canvas In Use, which says what uses it, for example "“Canvas 1” is on air and feeds 2 outputs. Deleting it takes it off air with its transition first. Its outputs are deleted with it." A canvas counts as in use when its Canvas input is on air, held or leaving, when it is on a Preview or in a multiview, or when an output carries it. Press Delete Anyway to go on. The canvas then leaves like any on-air input: it fades out with the transition it came in with, and its outputs are deleted with it. With Edit Live off and the canvas on air, the alert says it stays on air until the next take, then goes. One undo brings it back. A canvas that nothing uses is deleted at once.
A canvas region edit, Auto Blend included, follows Preview then Take: when the canvas is on air as an input (Add Input > Canvas lists the canvases that have no input yet) and Edit Live is off, the edit shows on Preview and goes to air at the next Take. With Edit Live on it airs at once. See Edit Live.
For blend, corner trims and warp on an output, see Projection.
Mix
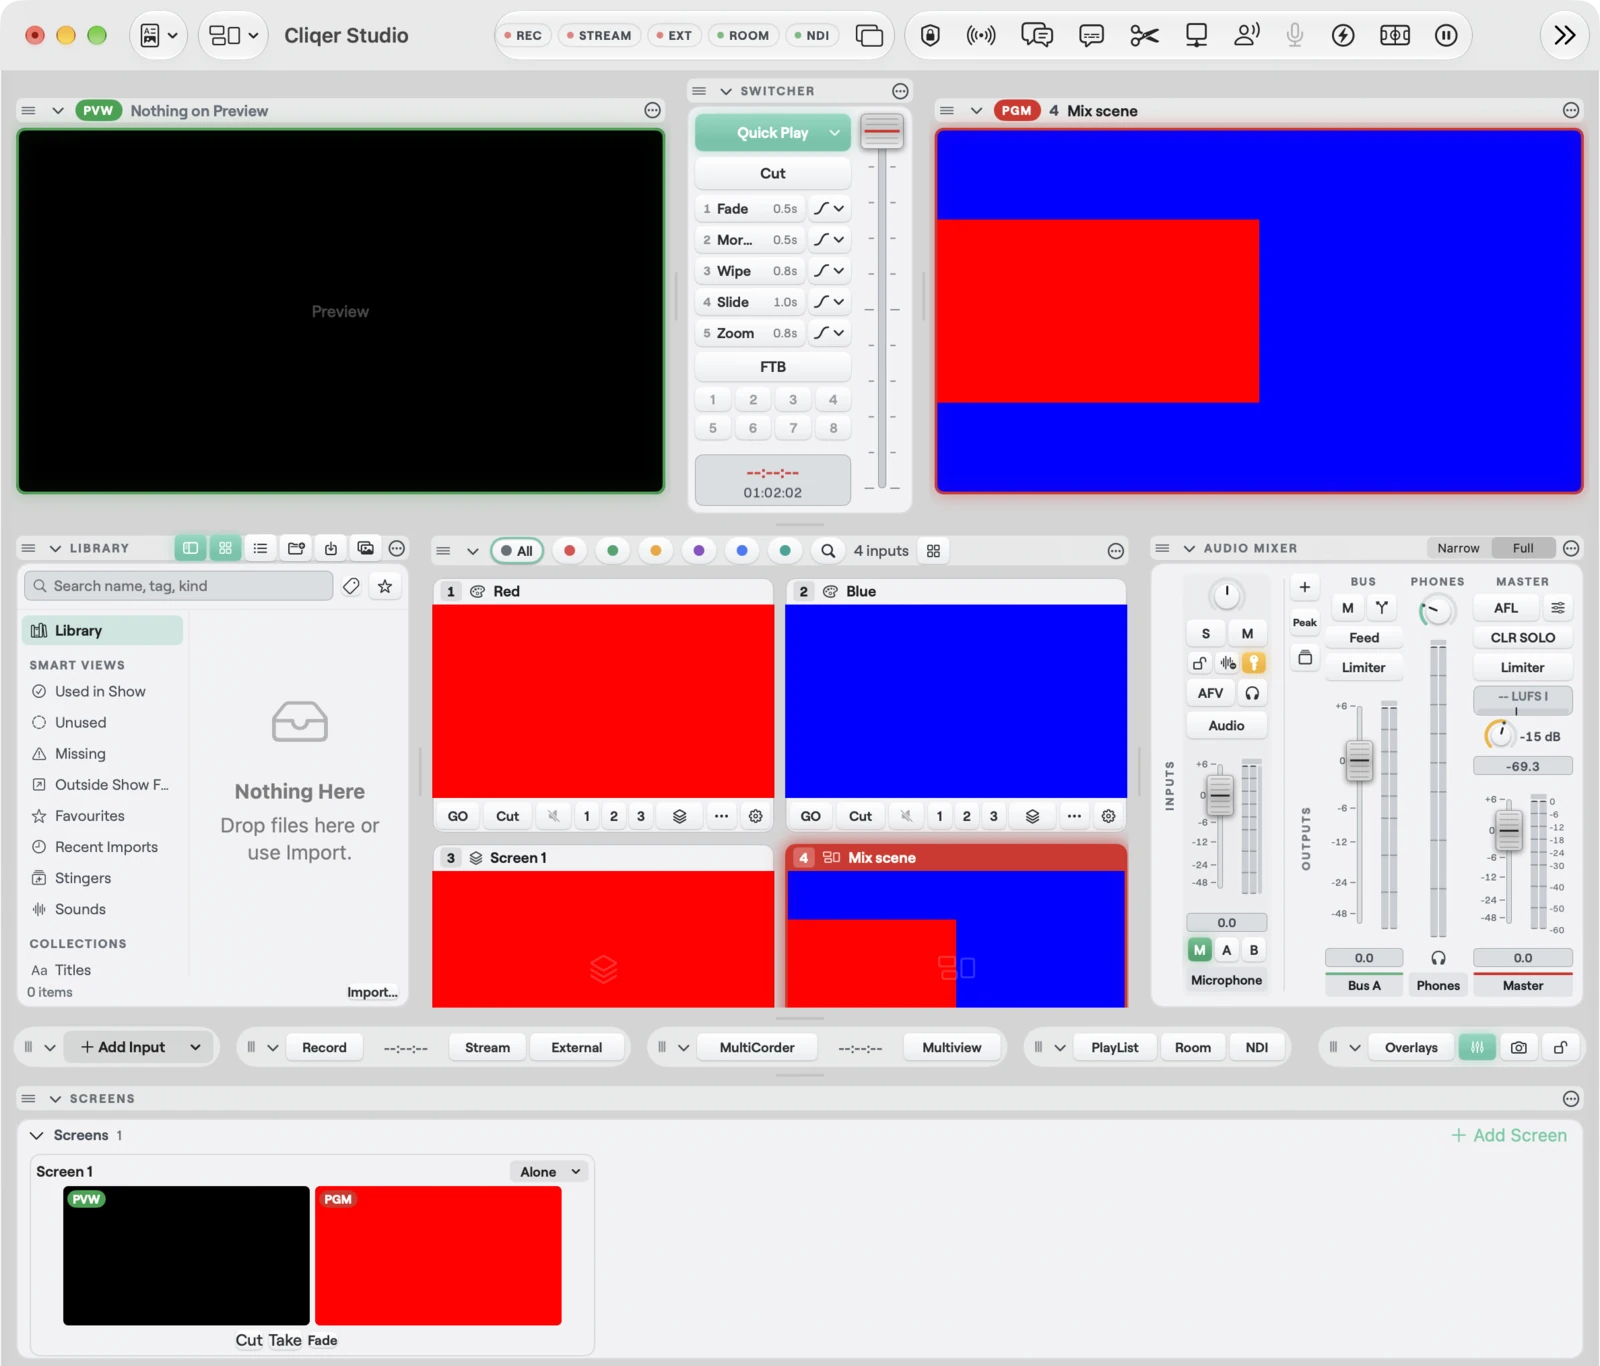
A Mix is a screen shown as an input. It draws the screen's Program, and you use it like any other input: on Preview, on Program, as a layer in a scene, on another screen's bus or in a timeline clip.
That makes a screen a small switcher inside your show. Build a picture on a screen with its own Take, then drop the whole thing into a scene as one layer.
Add a Mix
- Add a screen first. See Add, name and remove a screen.
- Open Add Input and choose Mix. A list shows every screen that does not have a Mix yet, by its name.
- Click a screen. A Mix input appears in the Inputs panel, named after the screen.
When there is no screen to offer, the list reads "No screens to mix".
A screen has one Mix at most. A screen that follows a source has no bus, so it is not listed. On a plan without screens, the Mix entry shows the standard plan message.
Rules
- A Mix carries no audio. It has no strip in the Audio mixer, and putting it on Program does not bring its inner inputs onto Program audio. Use the inputs' own audio settings.
- A Mix cannot show itself. Studio refuses any edit that would put a screen inside its own Mix, directly or through a scene, another Mix or a timeline clip. It shows the notice Cannot Show Itself: "A scene or Mix cannot be placed inside itself." A Mix can show another Mix as long as nothing loops back.
- A screen stays while a Mix names it. Remove on the screen is refused with Screen In Use. Remove the Mix input first.
- A screen cannot Follow a Mix.
- Remove a Mix as you remove any input. Removing a Mix does not remove its screen.
- Delete a Mix that is on air and it leaves like any on-air input. With Edit Live off, Preview loses it at once and Program keeps it until the next Program change, which takes it off with its own transition. With Edit Live on, it leaves at once with the transition it came in with. See Edit Live.
External Control
Five actions in the group Screens give a screen its Preview, Program, Cut and Take from a key, MIDI, OSC or Stream Deck. Each takes the screen number, 1 to 16 (the number in the screen's name, bus:<n>).
| Id | Action | Settings |
|---|---|---|
studio.screen_preview | Screen Preview: put an input on the screen's Preview | Screen, 1 to 16. Input (none clears it) |
studio.screen_program | Screen Program: put an input straight on the screen's Program | Screen, 1 to 16. Input (none is black). Fade time in milliseconds, 0 for a cut |
studio.screen_cut | Screen Cut: Preview to Program at once | Screen, 1 to 16 |
studio.screen_take | Screen Take: take with the first transition slot | Screen, 1 to 16 |
studio.screen_take_slot | Screen Take Slot: take with a chosen transition slot | Screen, 1 to 16. Slot, 0 to 4 (0 is the first) |
A Cut or Take on a linked screen takes the whole link. A Preview or Program action on a screen that follows a source is refused. Adding, naming and removing screens, and adding a Mix, are done in the app, not from External Control. See External Control.
Plan
Screens and Mix are on the Pro, Ultra, Studio and Enterprise plans. The Free plan and the free trial cannot add a screen, a canvas or a Mix.
| Plan feature or limit | What it does | Free and Trial | Pro | Ultra | Studio and Enterprise |
|---|---|---|---|---|---|
| Studio screens | Add and change screens, canvases and Mixes | No | Yes | Yes | Yes |
| Screens | How many screens you can hold | 0 | 2 | 4 | 16 |
A screen taller than your plan's output height is refused with the same plan message as an output. Removing a screen needs no plan, so you can always clean up after a plan lapses. See Plans and limits.
Windows and macOS
| Part | macOS | Windows |
|---|---|---|
| Where you add a screen | The strip's plus (Add Screen), the footer of the Screens view in the Outputs window (Add Screen or Canvas), Layer > Add Screen | The strip's plus (Add screen), Add screen or canvas in the Screens and canvases section of the Outputs window, Layer > Add Screen |
| Add a canvas | New Canvas... in the add menu, Layer > Add Canvas... | New canvas... in the add menu, Layer > Add Canvas... |
| Strip with no screens | Shows a Screens header with None yet and the plus | Not shown |
| Strip pictures | PVW and PGM | Preview and Program |
| Region boxes | Position (X, Y) and Size (W, H), lock button with help Lock aspect ratio | Position (X, Y) and Size (W, H), lock on the Size row |
| Size setting | Width and Height fields, any size within the limits | Raster list of six common sizes |
| Comfort screens | Section Comfort Screens in the add menu | Entries in the add menu, each ending in "screen" |
| Mix tile icon | Its own stacked-layers symbol | The same stacked-layers symbol |
| Modifier keys | Command | Ctrl |
Not built
| What | macOS | Windows |
|---|---|---|
| A way to draw a timeline's tracks on a screen | Not built | Not built |
| Audio on a screen | Not built | Not built |
Related
Teleprompter
A Teleprompter is an input that scrolls your script past a reading line. Add it, paste or import a script, set the look, the speed and the direction, jump between sections, watch the time left, and mirror it for a beam-splitter, per input or per output. Control it from keys, MIDI and Stream Deck. On Mac and on Windows.
Virtual Sets
Put your talent in a 3D studio. Pick a set, key each person into a slot, fill the set's screens, move the camera live and give each person an Enter and an Exit. Studio and Enterprise, on Mac and on Windows.