Transitions
Preview and Program
Studio always has two pictures that matter.
- Program is what the audience sees. It is what goes to the room, NDI, recordings, streams and the virtual camera. Its tally is red.
- Preview is what you have staged next. Only you see it. Its tally is green.
You choose Preview, then take it. A take puts the Preview source on Program, and the old Program source becomes the new Preview, so you can take straight back.
Ways to choose Preview: click an input's picture, press its number key, or use Preview in its menu. To skip Preview entirely, press Shift with the input's number to send it straight to Program as a cut (Preview stays as it was), or use the Cut key on its tile. Every take swaps the buses, as on ATEM and vMix: Preview goes to Program and the old Program lands on Preview. A take with nothing on Preview takes Program out to black and puts it on Preview, so the next take brings it back. Each screen's Take works the same on its own Preview and Program.
The switcher column
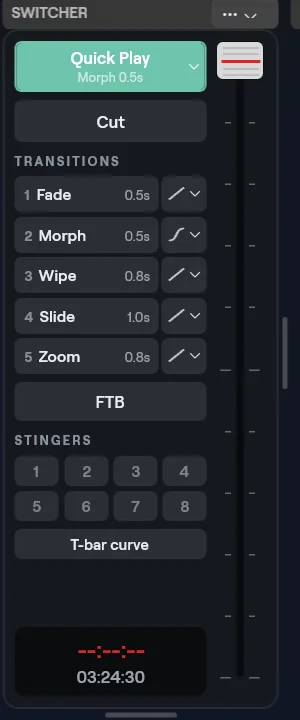
The Switcher panel, top to bottom: Quick Play, Cut, TRANSITIONS with five numbered buttons, FTB, STINGERS with eight keys, and the clocks. The T-bar runs full height beside them.
The Switcher panel (header SWITCHER) holds, from top to bottom: a green Quick Play key with its transition under the name, Cut, TRANSITIONS with five numbered rows, FTB, STINGERS with eight keys, the T-bar curve key and a clock well. The T-bar is drawn beside them for the full height of the column. In a short window the column goes compact: smaller keys, no section labels and no line under Quick Play.
| Control | What it does |
|---|---|
| Quick Play | Takes Preview to Program with the Quick Play transition. The key shows its effect and time, for example "Morph 0.5s" (on Windows in the full-size column; the tooltip says it too). On Windows it is the green key of the column, with a chevron that edits its transition. |
| Cut | Takes Preview to Program at once |
| Numbered transition buttons | Each button has its own effect and duration and shows them, for example "Fade 0.5s". The time is hidden for Cut |
| FTB | Fade to black (see below) |
| T-bar | A manual fader for a take |
Edit a transition
Open the editor for any numbered button or for Quick Play, and change its effect, direction, duration and curve.
Right-click the key, or click the small chevron on it (tooltip "Transition n settings: effect, direction, duration, curve"). A popover opens with the same form as the inspector, and an Assign Shortcut, MIDI or OSC... link at the bottom.
| Setting | Options |
|---|---|
| Effect | Cut, Fade, Morph, Wipe, Slide, Zoom, Alpha Fade |
| Direction | Left, Right, Up, Down. Wipe and Slide only |
| Duration | A slider from 0 to 5000 ms in steps of 50. Its number follows the drag, and you can drag the number or click it to type a value. Disabled for Cut |
| Curve | Linear, Ease In, Ease Out, Ease In Out, Smooth. Custom appears only when a show you opened carries one. Starts as Ease In Out. Disabled for Cut |
| T-bar follows the curve | One setting for all buttons: the manual T-bar runs through the curve of the first numbered transition |
Morph moves the layers that two scenes share from where they are to where they will be. With nothing shared it fades. It works the same on a screen's Take. See Scenes and looks.
Click the chevron beside a row (it shows the transition's curve symbol), or the chevron inside the right edge of the Quick Play key. A flyout opens to the right with the settings below. Quick Play keeps its own transition, edited the same way.
| Setting | Options |
|---|---|
| Effect | Toggle buttons Cut, Morph, Fade, Wipe, Slide, Zoom, Alpha Fade |
| Direction | Left, Right, Up, Down. Wipe and Slide only |
| Duration | 100 ms, 250 ms, 500 ms, 800 ms, 1000 ms, 1500 ms, 2000 ms, 3000 ms, 5000 ms. Disabled for Cut |
| Curve | Linear, Ease in, Ease out, Ease in and out, Smooth. Starts as Ease in and out. Disabled for Cut |
The T-bar curve key at the foot of the Switcher keys lights green when it is on. It makes the manual T-bar follow the curve of the first numbered transition.
Alpha Fade
Alpha Fade is a crossfade that follows each picture's transparency. On Program every pixel goes straight from the outgoing picture to the incoming one, both over black. Where the incoming source is transparent, the outgoing picture fades out instead of staying until the end and cutting. It suits keyed or transparent sources, such as a chroma-keyed camera or a title with a see-through background. It has a duration and a curve, and no direction. On an overlay channel, or when nothing is coming in, it fades like Fade.
It needs Studio Alpha Fade transition in your plan, on Pro and up (see Plans and limits). Setting it on a numbered transition, on Quick Play, on an overlay channel, or taking with it once all ask for it. A transition you already set keeps running if the plan later drops it, and switching to another effect never asks.
Without the feature the Effect list shows "Alpha Fade, needs upgrade" with a lock, and choosing it is refused.
Without the feature the Alpha Fade key is greyed out, and a note with an Upgrade button sits under the Effect keys.
The T-bar
The T-bar mixes Preview into Program by hand, using the effect of the first numbered transition. Drag it from the top to the bottom to move the picture across; the part you have travelled is lit red. Take it all the way to the end to complete the take, release it at the start to cancel, or leave it in between to hold the mix. It also moves by itself while a take runs, and rests at the top when idle.
Tooltip: "T-bar: drag to mix Preview into Program. Right-click for its curve." Grabbing the cap never makes it jump. Right-click the T-bar for: Curved T-bar (a tick toggle), Assign Shortcut, MIDI or OSC..., Cut and Quick Play. The T-bar is dimmed and ignores drags while switching is locked.
The T-bar is drawn by Cliqer: a recessed slot with a ribbed cap, and the part you have travelled lit red. Drag the cap (tooltip "T-bar: drag to mix Preview into Program"); grabbing it never makes it jump. It snaps back to the top when the take ends, and it takes the arrow keys when it has focus. There is no right-click menu on the T-bar; the T-bar curve key in the Switcher column sets its curve.
Quick Play
Quick Play is the one-key take: Preview to Program with the transition set on the Quick Play key. It is the default action of every tile's GO key (see Inputs), and it is what Quick Play in an input's menu does after putting that input on Preview.
Fade to Black (FTB)
FTB fades Program to black and back. It is a toggle: lit while Program is black. Windows labels the Program title bar FTB and "Fade to black" while it is on. On macOS you can also switch it from the Program monitor menu (Fade to Black). On Windows the FTB key lights red while it is on.
Stingers
Stingers are video clips that play over a take. Studio has eight stinger keys.
- Click an unset key (tooltip "Stinger n: not set. Click to choose a media input.") and pick from Set Stinger n from the media or list inputs. With none, the menu says "Add a video or image sequence input first".
- Or open a media input's inspector and use Use as Stinger > Stinger 1 to Stinger 8. Clear Stinger n removes it.
- The cut point is half way through the clip and the duration is the clip's length.
- A set key is lit red while it plays (tooltip "Transition with stinger n"). Right-click it for Clear Stinger n.
- Click an unset key (it is a drop-down named "Set stinger n") and pick from Set stinger n from the media inputs. With none, the menu says "Add a video input first".
- Or open a media input's menu and use Use as stinger > Stinger 1 to Stinger 8. Pick the ticked entry again to clear it.
- The cut point is half way through the clip and the duration is the clip's length (an image runs for one second).
- A set key shows its number and lights red while its stinger plays (named "Stinger n"). Press it to run the stinger. An unset key is dimmed; click it for the "Set stinger n" menu.
Press any stinger key while a stinger is playing to stop it. If its cut point has not come yet, the cut happens at once. A stinger leaves Program whenever it stops playing, so it cannot get stuck on screen.
Overlays
An overlay puts an input on top of Program, for example a lower picture-in-picture. There are eight overlay channels. An overlay channel has its own transition, so it fades or slides in when toggled.
| Ways to toggle an overlay | macOS | Windows |
|---|---|---|
| On a tile | Number keys 1 to 8, as many as the tile has room for, and the Overlays flyout with all eight and On Preview | Number keys 1 to 8, as many as the tile has room for, and the Overlays flyout with all eight and On Preview |
| In a menu | Tile menu Overlay, or Studio > Overlay > Toggle Overlay n (acts on the selected input) | Input menu Overlay. Overlay on Preview puts it on that channel's Preview |
| Keys | Option+1 to Option+8 (default) | Alt+1 to Alt+8 |
An overlay on a channel's Preview is staged, not on air.
Channel settings: Program monitor menu Overlay Channels..., the Overlays key in the bottom bar, or the toolbar Inspector. The panel has Channel (Overlay 1 to Overlay 8), On air (what is on the channel, or "Off"), Turn Off, a Transition section (Effect, Duration 0 to 5000 ms), and Auto close: never or Auto close: n s (0 to 600 s) to take the overlay down by itself. Overlay transitions have no direction or curve.
Tools bar Overlay button (Overlay channels): pick a channel (Overlay 1 to Overlay 8) in the flyout. It shows what is on air and on Preview for the channel, a Turn off button, the transition effect, direction and duration, and Auto close after (seconds, 0 never). Overlay transitions have no curve.
Overlays are a plan feature on some plans. See Plans and limits.
PlayList
The PlayList key in the bottom bar runs a timed sequence of your inputs. Click the cog (Play list items) to edit it in the inspector: each row has an input and a time in seconds (0 to 600; 0 waits for the clip to end, or for Next), and Add Item adds one (5 seconds, Quick Play transition). Use Previous, Start / Stop and Next. The key lights red while running. With no items the key opens the editor.
The PlayList toggle in the Outputs bar starts and stops a timed sequence of your inputs. It is lit while it runs. The cog beside it opens the list: each row has an input and a time in seconds (0 to 600; 0 waits for the clip to end, or for Next), and Add item adds one (5 seconds, Quick Play transition). Use Previous and Next to move along.
Lock switching
Lock freezes every control that changes what is on air. See Inputs.
Keyboard keys
Keys work when the Studio window is focused. Single-letter and number keys pause while you type in a text box.
Studio keys come from your External Control configuration, so you can rebind them (see External Control). The shipped Default configuration:
| Key | Action |
|---|---|
| 1 to 9, 0 | Put input 1 to 10 on Preview |
| Shift+1 to Shift+0 | Input 1 to 10 straight to Program |
| Space | Quick Play |
| Return | Cut |
| Command+1 to Command+5 | Take numbered transition 1 to 5 |
| Option+1 to Option+8 | Toggle overlay 1 to 8 for the selected input |
| B | Fade to Black |
| M | Audio on or off for the selected input |
| Command+R | Record |
| Command+Shift+L | Stream |
These stay fixed: Option+Command+0 (Open Studio), Option+Command+M (Audio Mixer), Shift+Command+K (Lock Switching), Command+F (search inputs), Command+Z and Shift+Command+Z (undo and redo scene edits while Studio or a Scene Editor is the front window). The Studio menu lists the current keys beside each action. Right-click a switcher control and choose Assign Shortcut, MIDI or OSC... to bind your own.
Studio keys come from your External Control configuration, so you can rebind them with Edit shortcuts... in the ? list, or by choosing Assign Shortcut, MIDI or OSC... on a control (see External Control). The ? list shows the active configuration's keys. The shipped Default configuration:
| Key | Action |
|---|---|
| 1 to 9, 0 | Put input 1 to 10 on Preview |
| Shift+1 to Shift+0 | Input 1 to 10 straight to Program as a cut |
| Space | Quick Play |
| Enter | Cut |
| Ctrl+1 to Ctrl+5 | Take numbered transition 1 to 5 |
| Alt+1 to Alt+8 | Toggle overlay 1 to 8 for the selected input |
| B | Fade to black |
| M | Audio on or off for the selected input |
| Ctrl+R | Record |
| Ctrl+Shift+L | Stream |
| Ctrl+Alt+M | Show or hide the Audio Mixer |
| Ctrl+Shift+K | Lock or unlock switching |
| Ctrl+Z, Ctrl+Y, Ctrl+Shift+Z | Undo and redo scene edits |
Clocks
Under the stingers is a large red clock: recording time while recording, otherwise the event clock, or --:--:-- when neither runs. Below it is the wall clock in HH:mm:ss.
A well at the foot of the column holds a red clock and the wall clock in HH:mm:ss under it. The red clock shows recording time while recording, otherwise the event clock, or --:--:-- when neither runs.
Scenes and Looks
Build picture-in-picture, side-by-side and floating-card layouts from your inputs with scenes, the Scene Editor, templates and hero looks.
Audio Mixer
The Studio mixer has a strip for every input with sound, as many Groups and Returns as you add, a headphones mix and a Master. Learn the strip controls, the sends, the faders and meters, and how to choose what the room and NDI hear.