Studio
Studio is a live switcher built into the Cliqer desktop app. You add inputs (screens, cameras, NDI sources, people on a video call, media files, web pages, scenes), put one on Preview, take it to Program with a transition, and Studio sends Program to wherever you choose: the room, an NDI source, a recording, a live stream or a virtual camera.
Open Studio
Any of these opens the single Cliqer Studio window:
- Menu bar: Studio > Open Studio (Option+Command+0).
- Dock menu: right-click the Cliqer icon, then Open Studio.
- Classic Panel layout: the Studio button (people icon) in the icon row. Its tooltip reads "Sign in to use Studio" while you are signed out.
- Split View layout: the Studio section, Open Studio button.
The window opens at 1100 by 680 points the first time and grows to fit your open panels. Size and position are remembered separately for each combination of screens, so a laptop on its own and the same laptop at a desk each keep their own frame.
Any of these opens the single Cliqer Studio window:
- Menu bar: Studio > Open Studio (Ctrl+Alt+0).
- Classic layout: the Studio icon (signed in only).
- Windows layout: Open Studio in new window in the command bar.
The minimum width is 1240 DIP. Size and position are remembered per set of monitors.
The window
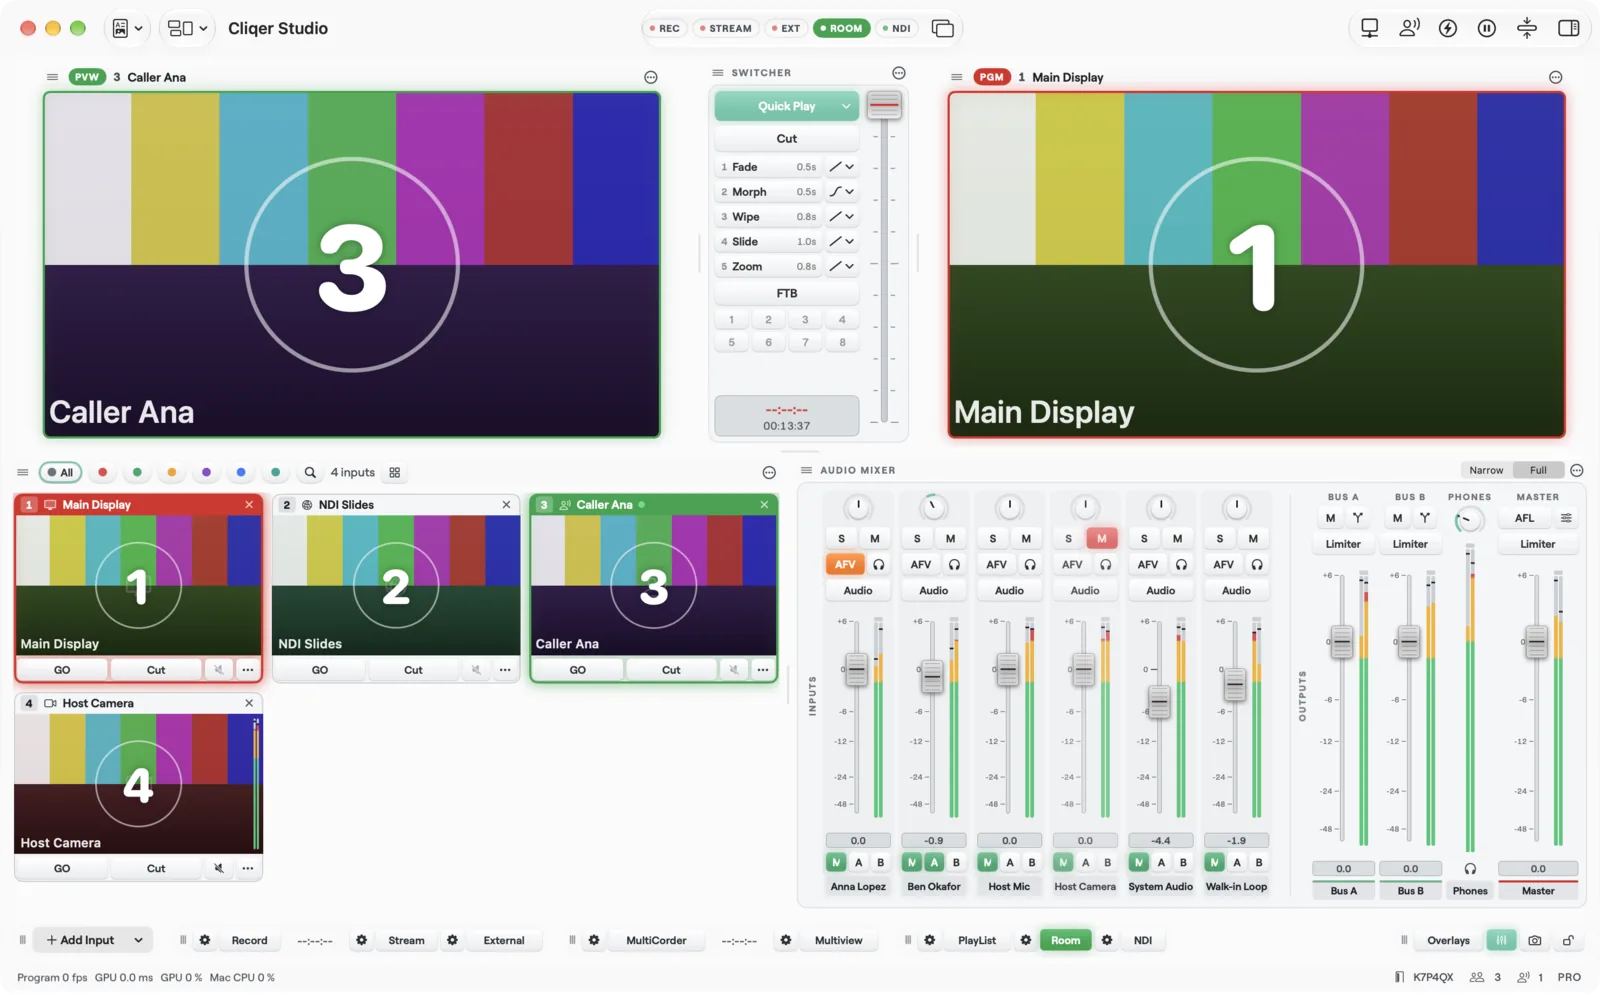
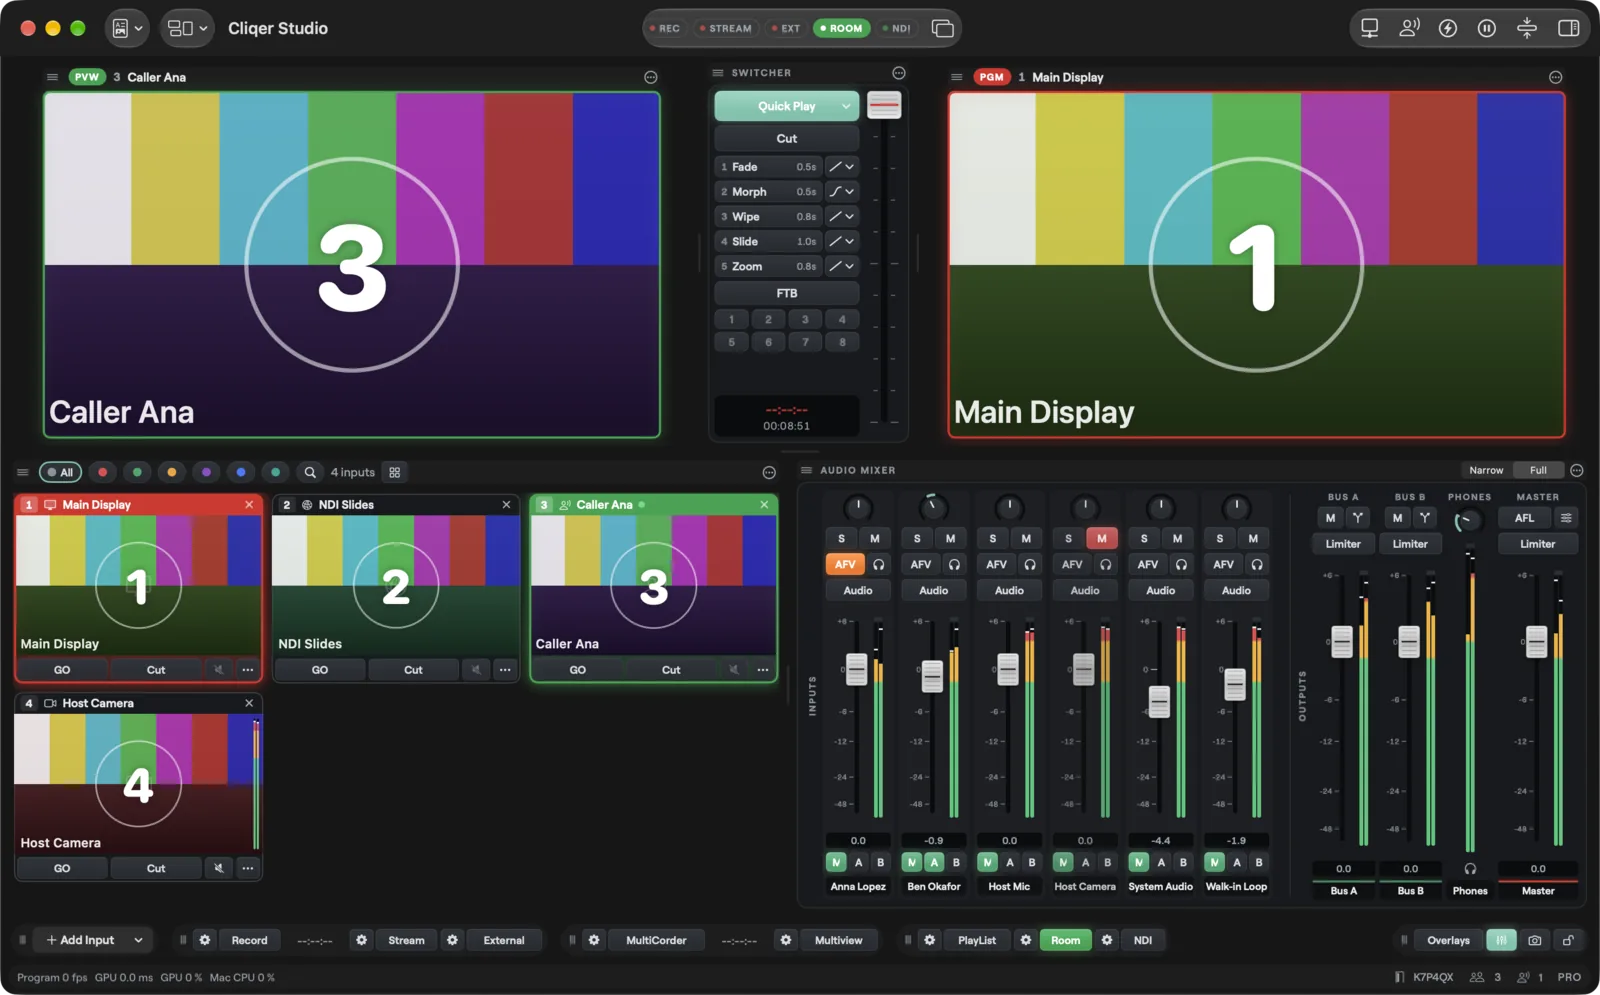
Studio is built from panels that you can move, resize, close and reopen, and a row of key groups along the bottom. The arrangement is called a layout and is saved for you. Panel names are the same on both platforms, apart from the transition column.
| Region | What it holds |
|---|---|
| Toolbar (leading) | Show menu (New Show, Open Show..., Save Show, Save Show As..., Open Last Show) and Layouts menu |
| Toolbar (centre) | Output lamps REC, STREAM, EXT, ROOM, NDI, and the Display menu (show Program or Preview on a display) |
| Toolbar (trailing) | Go Live key (becomes End Live while live), Live button (accounts and comments), Captions button (live captions, custom words and fixes), Outputs (opens the Outputs window), Callers N (opens Chat), Automation, Pause Inputs, Basic, Inspector |
| Preview panel | The next source, tally ring green, badge PVW |
| Switcher panel | Quick Play, Cut, five transition buttons, FTB, eight stinger keys, the T-bar and the clocks |
| Program panel | What is live, tally ring red, badge PGM |
| Inputs panel | Category chips, search, tile size, the Tiles or Layers switch, and the grid of input tiles or the Layers view |
| Library panel | Every file the show uses, in bins and smart views, with search and import. See Library |
| Audio Mixer panel | One strip per input with sound, plus Bus A, Bus B, Phones and Master |
| Multiview panel | A grid of Preview, Program and inputs. Closed by default |
| Replay group | A bottom bar group for the replay ring: In, Out, Save and Play. Closed by default, so open it from Layouts > Panels. See Replay |
| Bottom bar | Key groups Add Input, Record, Stream and External, MultiCorder and Multiview, PlayList, Room and NDI, Overlays and Tools |
| Status line | The Program frame rate (Program 60 fps), GPU and CPU load, stream time, show name, room code, viewers, callers, plan |
| Inspector | A side column for the selected input, transition, overlay or play list. Never a dialog |
The only built-in layout is Classic: Preview, Switcher and Program across the top, Library, Inputs and Audio Mixer side by side in the middle, the bottom bar underneath. See Layouts.
| Region | What it holds |
|---|---|
| Top bar | Preset (Undo and Redo; the show commands are in the File menu of the menu bar), Outputs, output lamps STREAM, REC, EXT, ROOM, NDI, then the Go Live key (becomes End Live while live) and the Live button (accounts and comments) and the Captions button (live captions, custom words and fixes), then Callers, Automation, Pause Inputs, Panels, Layout, Basic, Settings and ? (keyboard help) |
| Preview panel | The next source, green title bar |
| Transitions panel | Quick Play, Cut, five transition buttons, FTB, stinger keys, the T-bar |
| Program panel | What is live, red title bar, with a master level meter |
| Inputs panel | Category swatches, search, tile size, an Audio Mixer toggle, the Input view menu (Tiles or Layers) and the grid of input tiles or the Layers view |
| Library panel | Every file the show uses, in bins and smart views. Not in the Classic layout: open it from Panels. See Library |
| Audio Mixer panel | One strip per input with sound, plus outputs. Shown only when the screen is tall enough |
| Multiview panel | A grid of Preview, Program and inputs |
| Replay panel | The replay ring: Mark in, Mark out, Save clip and Play replay. Closed by default, so open it from Panels. See Replay |
| Outputs bar | Add Input, Record, External, Stream, MultiCorder, PlayList, Room, NDI |
| Tools bar | Overlay channels, List view, Audio levels on tiles, Multiview panel, Snapshot of Program, the lock |
| Status readout | FPS (the Program frame rate), Render, GPU, GPU Mem and CPU, the MultiCorder time (ISO) while it records, and at the right the room, input count and caller count |
The default layout is also called Classic: Preview, Switcher and Program across the top, Inputs and the Audio Mixer in the middle, the Outputs bar and Tools bar underneath.
The Program frame rate in the status line (FPS on Windows) counts the Program frames delivered in the last second, so a stall shows. While nothing uses Program, Program is not drawn, and the cell shows the rate the engine runs at, the Frame rate in Settings, instead of 0. If nothing at all needs the clock, it keeps its last value.
A toolbar key that holds a state lights amber while it is on, on both systems, and returns to the plain glass when it is off. A key that opens a popover or flyout, such as Live and Captions, also lights while that popover is open. Momentary keys never light.
| Lights amber when | |
|---|---|
| macOS | Lock (show locked), Live (popover open), Captions (captions running or popover open), Automation (auto switching on), Basic (basic mode on), Inspector (inspector shown), and Cells in the Multiview window (popover open) |
| Windows | Lock (show locked), Live (flyout open), Captions (captions running or flyout open), Automation, Basic and Inspector (same meaning as on macOS) |
How a picture travels
Every input is a live source. You choose one for Preview, then a take (Cut, Quick Play, a numbered transition, the T-bar or a click on an input's GO key) swaps Preview and Program. Program feeds every output at once.
Overlays (up to 8 channels) sit on top of Program, and Scenes can be inputs themselves, built from layers of other inputs.
Audio takes its own path
Each input with sound gets a mixer strip. Strips feed Master (the Program mix), Bus A, Bus B and the Headphones mix. The room and the NDI output each choose which bus they hear.
Details are on Audio mixer.
Layouts and Basic mode
- Drag a panel by its grip (tooltip "Drag to move ...") and drop it on the outer edge of another panel to dock beside it, or on the middle to swap the two.
- Drag the dividers to resize.
- Each panel menu has Close .... Reopen from Layouts > Panels.
- Layouts also offers Save Layout, Save Layout As..., Rename Layout..., Delete Layout..., Reset to Classic (or Revert Layout) and Tile Size (Small, Medium, Large, Extra Large).
- Basic hides the category chips, search, the Audio Mixer and the status line to leave a simpler window. The mixer is hidden, not closed. Basic is not saved.
- The small cog buttons on the bottom bar hide when the window is narrower than 1420 points. Right-click the key instead to open the same settings.
- Drag a panel by its header and drop it on the edge of another panel to dock it there. A green rectangle named "Drop here" previews the landing. Dropping on the panel itself does nothing.
- Drag the splitters to resize.
- Each panel header menu has Close .... Reopen from Panels in the top bar.
Layout: name(the current layout's name) opens a list of layouts with a New layout name box, Save as new layout, Reset to Classic and Delete this layout.- The menu bar has the same commands in Studio > Layouts: the saved layouts (the current one ticked), then Save Layout, Save Layout As..., Rename Layout..., Delete Layout... and Reset to Classic (Revert Layout on a saved layout). View > Panels reopens panels.
- Basic ("Basic view: fewer tile buttons") hides the button rows on the input tiles.
- Tile sizes: Small, Medium, Large, Extra Large.
Replay
The replay ring keeps the last seconds of Program on disk. Mark an In and an Out point to save a clip, which then appears as a media input, or play the last seconds again at a lower speed on Preview or straight to Program. Stopping the ring deletes it. Ultra and up replay Program. More angles, Quad and a Default angle need the Replay add-on on Ultra, and are included on Studio and Enterprise. Without replay in your plan the controls are greyed out.
In the Replay bottom bar group, Replay starts and stops the ring, In and Out mark the clip, Save adds it as a media input and Play shows the last seconds again. The cog (Replay settings) holds Ring length (5 to 300 s), Last (how many seconds Play shows), Speed (100%, 75%, 50% or 25%) and Show on (Preview or Program).
In the Replay panel, Replay ring starts and stops the ring and Keep the last seconds sets its length. Mark in, Mark out and Save clip make a clip. Under Instant replay, choose Replay the last seconds, Replay speed (100%, 75%, 50% or 25%) and Replay goes to (To Preview or Straight to Program), then Play replay.
Go Live and the Live flyout
The Go Live key in the top bar starts a broadcast on the platforms chosen in the Live flyout, and ends it again. While idle the key is plain, not filled; it turns red and reads End Live only while you are live. The tooltip says "Go live on the chosen platforms" before and "End the broadcasts" while live.
If no platform is chosen or the broadcast has no title, Go Live does not start. On macOS the Live popover opens instead, where you set both. On Windows an alert says Choose a Platform or Broadcast Needs a Title; open the Live flyout to fix it.
The Live button next to it opens the flyout (a popover on macOS). It reads Live N when N comments are waiting. The macOS popover opens at 360 by 520 points and reflows its rows when it is given less room, so no label or switch is cut at the sides; the input pop-up of the schedule is capped at 200 points wide, so a long input name cannot widen it. The flyout holds:
- Go Live setup (heading Go live on Windows): Title, Description, Who can watch (Public, Unlisted or Private) and, once Facebook is connected, a Facebook destination list that starts at Timeline.
- One row per platform (YouTube and Facebook): a Publish to switch for that platform, a status line and a Connect button. While linked the button reads Disconnect, and while signing in it reads Cancel. The status line reads "Not connected", "Finish signing in in your browser", "Enter (code) in your browser", "Connecting" or the account name once connected, or "Not available in this build" when the build was made without that platform's sign-in app id (a YouTube client id for YouTube, a Facebook app id for Facebook). In that case Connect is greyed out on both platforms, and no sign-in is possible in that build.
- Comments (N): a Read switch that reads the comments of your live broadcasts, then for each waiting comment Show (put it on air) and Drop, and the buttons Next Comment and Take Off Air. Without comments it says "No comments waiting."; with Read off it says "Reads the comments of the live broadcasts. Go live first."
Captions
The Captions button after the Live button opens the captions popover (a flyout on Windows). It lights amber while live captions run or its popover is open. The captions are not part of the Live popover. It holds the status (Off, Starting or Listening), a Live captions switch, Also send to YouTube, the Custom words box and the Write as fixes.
Also send to YouTube sends the live captions into your YouTube broadcast. YouTube only lets a broadcast take captions if they were switched on before it was created, and Cliqer's broadcast goes live as soon as its stream arrives. So while a YouTube broadcast that was made without captions is running, the switch is off and greyed out. The reason shows when you hover it (on macOS as its help text, on Windows as its tooltip): "This broadcast was made without captions and YouTube cannot add them once it is live. Turn this on before going live." Turn the switch on before you press Go Live and it works. Turning it off always works, and once that broadcast has ended the switch is free again, so captions work on the next broadcast. The caption numbering starts again with each broadcast.
If YouTube stops taking the captions during a broadcast, Cliqer shows one passing notice titled Captions Not Reaching YouTube: "YouTube is not taking the live captions. Cliqer keeps sending each new line." You get it once per outage, and again only after a caption has gone through and a later one fails.
Windows has the same flyouts, with the same words. Its Publish to switches carry no visible label, only the platform name beside them.
Plans
Studio itself follows your plan: some inputs, outputs and editors are included only in certain plans, and caps such as the number of inputs differ by plan. When you use something your plan does not include, Studio shows a message and does nothing else.
Dialog title Plan Limit Reached: "Your plan does not include ...". Its Upgrade button opens your account page. After the first refusal a lock badge Plan limit appears in the Inputs category row. The status line shows your plan name in capitals.
Dialog title Upgrade to use this: "Your plan does not include ... Upgrade on cliqer.io to use it." Buttons Upgrade and Close.
See Plans and limits for what each plan includes.