Room Designer
Room Designer lets you prepare the view people see when they open your room link. Arrange the video, navigation buttons, notes and timer, then apply your organisation's colours and logo.
Open Dashboard > Room Designer. Use Layout for the participant view and Branding for host and participant appearance.
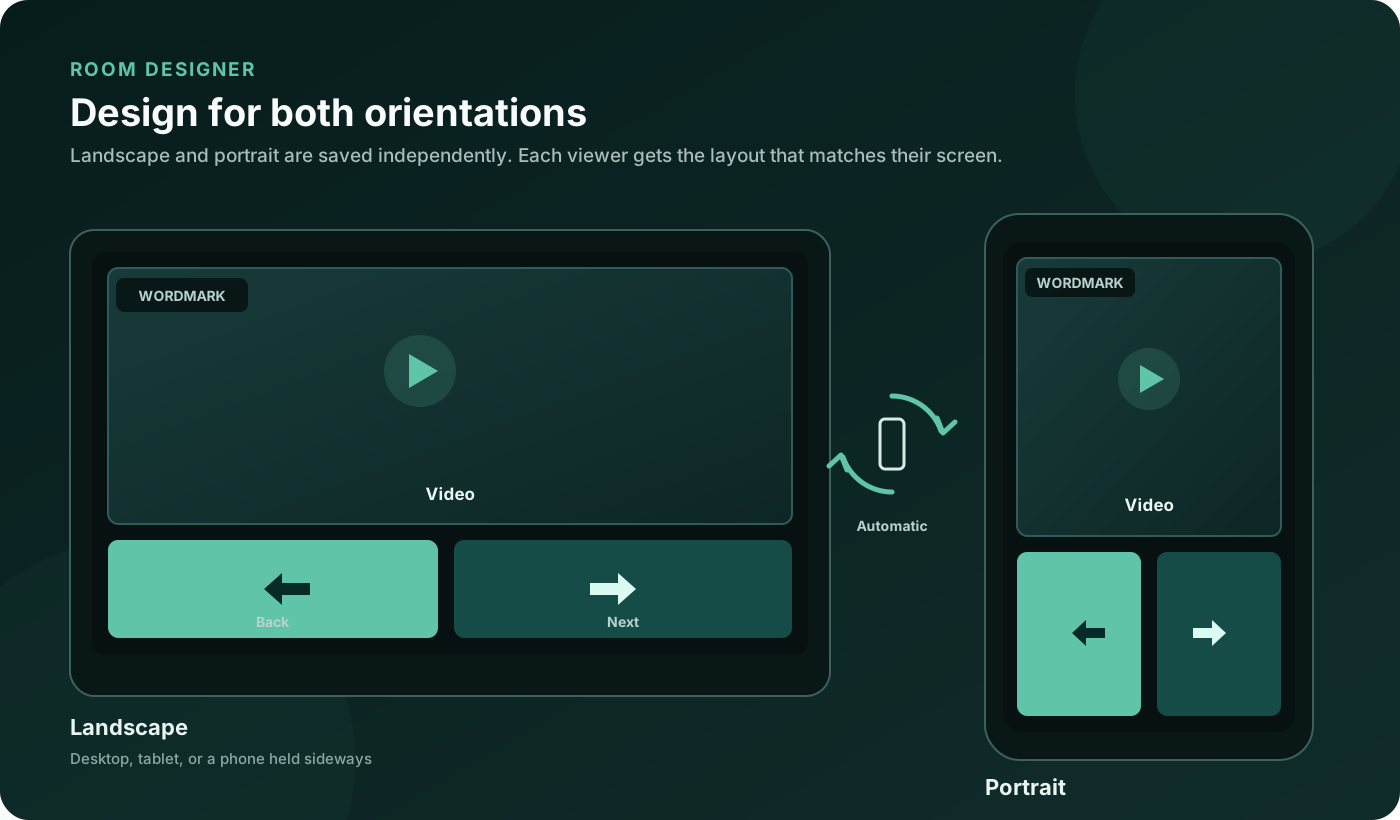
Landscape and portrait are separate designs. The room chooses the one that matches each participant's screen orientation.
Quick start: video, bottom buttons, no notes or sound
- Open Layout and select Landscape.
- Choose the Presentation preset. It turns on the custom layout, places video above the buttons and hides slide notes.
- Under Participant defaults, check that Open speaker notes on arrival is off and Start shared audio muted is on.
- Select Portrait and apply the same preset. Adjust the proportions for an upright phone.
- In the host app, use Global Screen Share to select the screen, NDI source or Studio Program you want to share.
- Wait for Saved, then share your normal room link.
- Open the link on a second device to check both orientations and the selected source before your event.
New participants receive the source assigned by the host. The Designer arranges the view around that source; it does not start capture or override source assignments.
Shared audio and click sounds are separate. The Designer's mute default controls incoming shared audio. If you also want silence when someone clicks, turn off click sounds in the host app's sound settings. Participants can unmute shared audio afterwards; browser audio playback can still require a user interaction.
Plans and where changes apply
| Feature | Availability |
|---|---|
| Saved landscape and portrait layouts, presets and participant defaults | Ultra and above |
| Timer placement and appearance in a custom layout | Ultra and above; a host countdown must be shared |
| Host and participant colours, gradients, themes and badge style | Ultra and above |
| Custom app icon, participant wordmark and removal of Cliqer marks | Studio and above |
| Custom domains and team licensing | Studio and above, configured separately |
The room uses the design saved by its owning account. The plan or licence key used to start the room determines which saved features appear. For example, a design saved by a Studio account does not enable whitelabel branding in a room started with a lower-tier key.
The Branding tab's Where branding applies panel shows which of your plans and keys support colours or full branding.
Choose a starting layout
| Preset | Starting view |
|---|---|
| Presentation | Video above bottom buttons, notes hidden. Also enables participant defaults with notes closed and shared audio muted. |
| Speaker notes | Video, a dedicated notes area and bottom navigation. |
| Video focus | Full-canvas video with navigation, notes and timer hidden. Logo visibility follows your current setting. |
| Big buttons | Large navigation controls with video and notes hidden. |
A preset replaces only the selected orientation's arrangement. Presentation also sets the shared participant defaults, which apply to both orientations. Use Undo if you want to revert a preset.
The Desktop, Tablet and Phone selector changes the preview proportions. It helps you check how the same percentage-based layout fits different screens; it does not create three additional saved layouts.
Arrange the elements
Turn on Custom layout, choose Landscape or Portrait, then select an element from the list or canvas.
| Element | Purpose | Move and resize | Hide |
|---|---|---|---|
| Video | The host's shared screen or video | Yes | Yes |
| Back button | Previous-slide control | Yes | Yes |
| Next button | Next-slide control | Yes | Yes |
| Slide notes | Notes shared for the current slide | Yes | Yes |
| Timer | The host's live countdown | Yes | Yes |
| Logo | Cliqer wordmark, or your Studio wordmark | Yes | Studio and above |
Use the eye control to show or hide an element. Visibility is saved independently for landscape and portrait. Hiding both navigation buttons removes the large click controls, so the editor shows a warning.
The logo can be moved and resized independently in each orientation. Ultra users position the Cliqer wordmark. Studio users can replace it in Branding or hide it with the eye control.
Move precisely
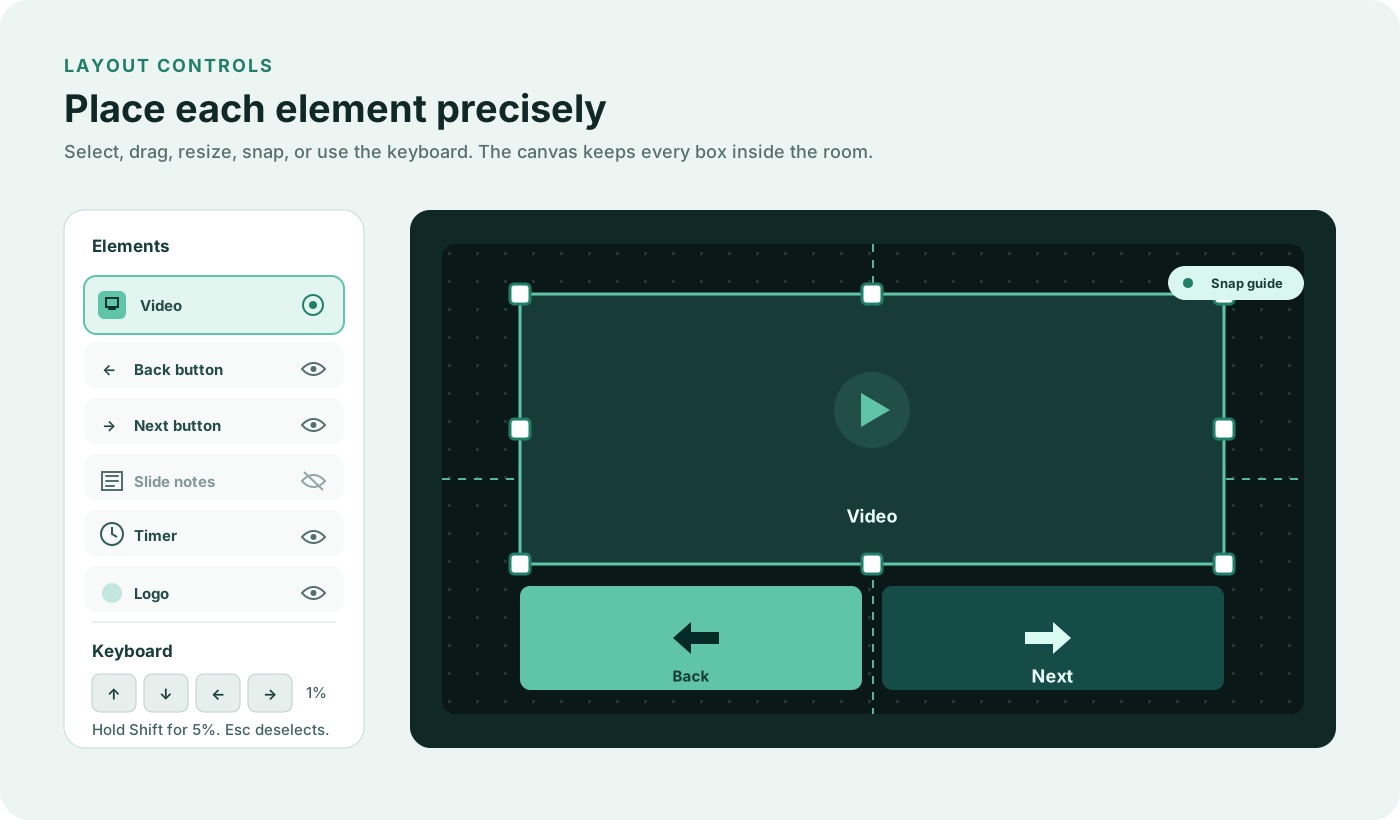
- Drag a selected box to move it, or drag its handles to resize it.
- Boxes snap to canvas edges, centres and other visible elements.
- Select an element with the keyboard using Tab, then Enter or Space.
- Press an arrow key to move the selection by 1% of the viewport.
- Hold Shift with an arrow key to move by 5%.
- Press Esc to clear the selection.
Boxes stay inside the canvas. Each movable box has a minimum width and height of 6% of the viewport. Positions and sizes are percentages, so the design scales with the available space.
Landscape and portrait
Landscape is used when the viewer's screen is wider than it is tall. Portrait is used when it is taller than it is wide. Rotating a phone switches between your saved designs.
Editing one orientation does not move elements in the other. Check both before sharing a room, especially where a wide video, long notes or a timer might compete for space.
Set participant defaults
Turn on Set participant defaults to choose the starting preferences for your room:
| Option | Effect |
|---|---|
| Buttons at the bottom | Starts the built-in room view with bottom buttons. Custom layouts use the positions on your canvas. |
| Open speaker notes on arrival | Starts with the participant notes control open. A custom layout must also have its Notes element visible. |
| Start shared audio muted | Mutes incoming shared audio initially. Participants can turn it on themselves. |
These are starting preferences, not locked controls. They apply to an entitled room even when Custom layout is off. Editing geometry or colours does not continually reset a participant's choices. Updating the defaults themselves applies the new preferences to connected participants.
Existing saved designs keep their previous preference behaviour until you explicitly enable defaults or choose the Presentation preset.
Place and customise the timer
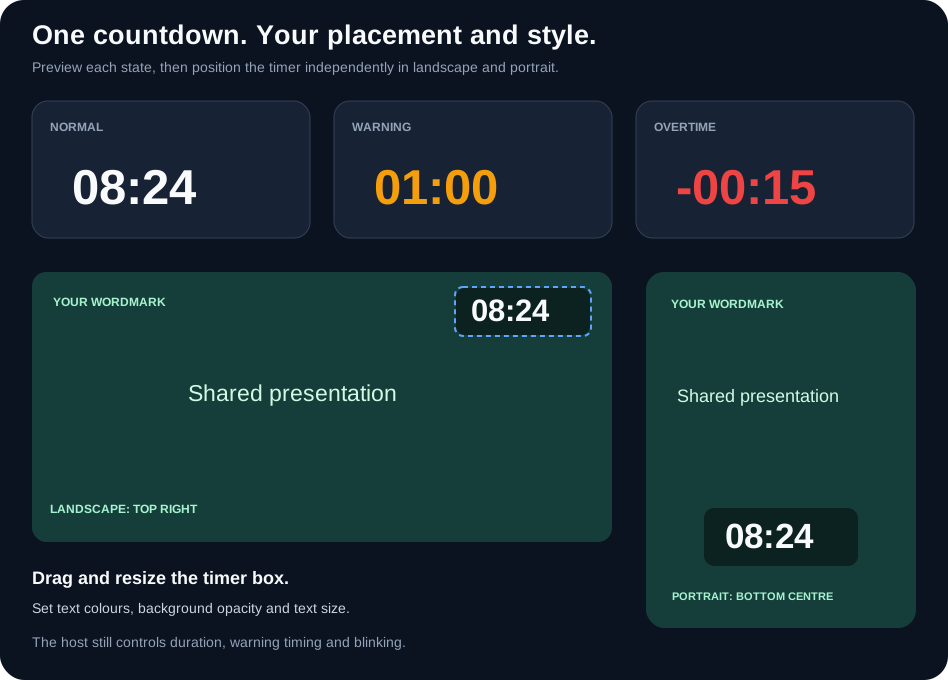
- Select Timer in the element list.
- Turn on its eye control if it is hidden.
- Drag and resize the timer box on the canvas.
- Set Normal text, Warning text, Overtime text and Background colours.
- Adjust Background opacity and Text size.
- Use Preview state to inspect normal, warning and overtime colours.
- Switch orientation and position the timer for the other screen shape.
The preview uses example times. The actual room displays the host's existing live countdown, including warning, overtime and blinking states. It does not create another timer or change its duration or warning thresholds.
The placed timer uses the same browser typography as the standard participant timer, with stable-width digits. Text fits within its box; enlarge the box if a large text setting appears constrained. Reset timer appearance restores its colours, opacity and text size without moving it.
A live countdown must be active and shared by the host before the timer appears in the room. In a custom layout, hiding the Timer element hides the countdown there; it does not stop the host's timer. In the built-in or multi-host view, the standard timer location is used.
Make it your brand
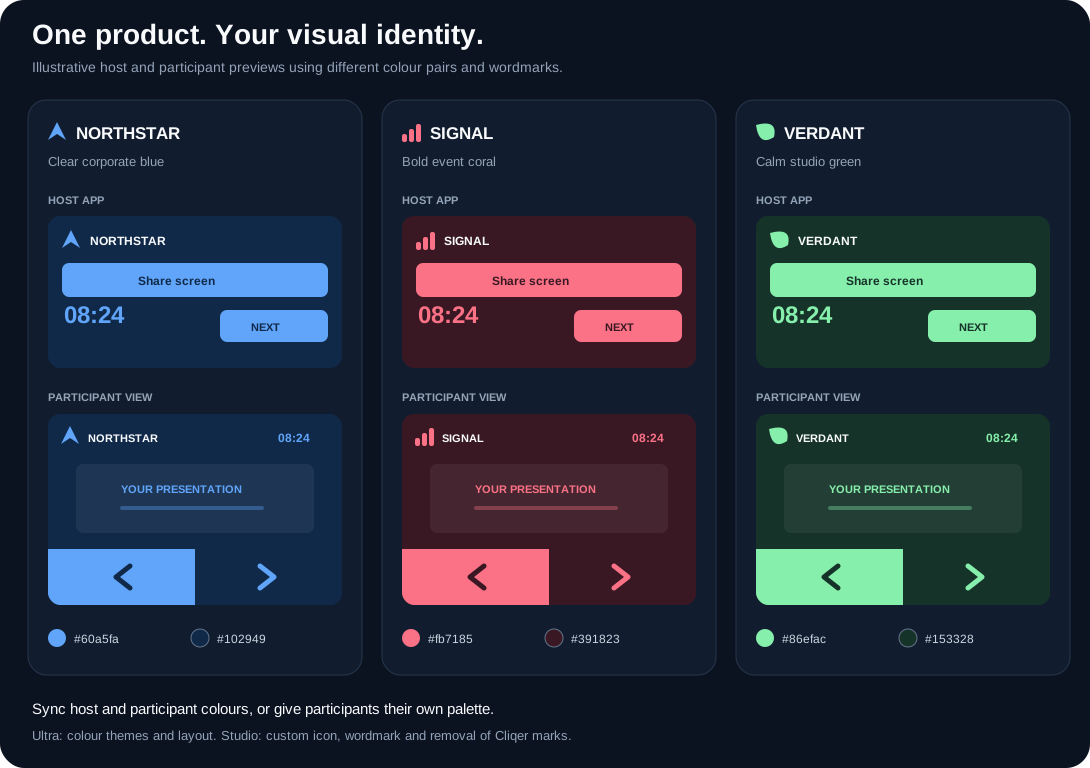
Illustrative previews with fictional brands. They show how one saved identity can carry from the host app to the participant view.
Open Branding in Room Designer, or Settings > Branding. Both locations edit the same saved settings.
Host and participant colours
Host app colours control the primary and secondary palette used by the desktop host app and dashboard. Presenter colours control the remote participant room.
Keep presenter colours synced to the host for a consistent identity. Turn sync off to use a separate participant palette, for example a dark production desk for the operator and brighter controls for remote speakers. Changing the participant palette does not require changing the host palette.
You can also configure:
- Host gradient and Presenter gradient independently.
- Host theme: light, dark or the device setting.
- Presenter theme: follow the host or use its own light, dark or device setting.
- Badge style: default, rounded or square.
For clear controls, choose a primary and secondary pair with strong contrast. Preview solid colours as well as gradients, and check your logo against both light and dark backgrounds.
Your icon and wordmark
Studio whitelabel branding supports two separate image assets:
| Asset | Where it is used | Preparation |
|---|---|---|
| Icon | The desktop host app's compact brand mark | Use a simple, recognisable symbol. |
| Wordmark | The desktop host app and participant room | Use your organisation or event's full logo with readable lettering. |
Upload JPG, JPEG, PNG or GIF files up to 2 MB each. A transparent PNG usually works well when the image needs to sit over different backgrounds. Uploading an icon does not automatically replace the participant wordmark; set both assets for a complete identity.
Use Show to temporarily hide an asset while keeping the upload saved. In Layout, move and resize the room logo separately for Landscape and Portrait. Ultra can position and size the Cliqer wordmark; Studio can replace it or hide it in either orientation. Both the Branding visibility setting and the active layout's Logo visibility must allow a Studio wordmark for it to appear.
Examples you can build with the same controls:
- A corporate room with a blue palette, company wordmark, slides and bottom navigation.
- An event room with a bright colour pair, event logo, large buttons and a visible countdown.
- A client production with a subdued host palette and a separate client-branded participant view.
- A minimal video-focused room with controls hidden and, on Studio, the logo hidden too.
Custom domains can complete the Studio experience with your own room address. Configure them separately under the dashboard's custom domain settings. They are not changed by uploading a logo.
Save, undo and reset
Layout edits autosave after a short pause. The header shows Saving, then Saved when the latest edit is stored. Not saved means a request failed: your current edits stay in the editor, and Retry sends them again. Wait for Saved before closing the page.
Connected room pages receive saved changes live. Another open Designer tab follows saved changes. Treat edits during an event as live changes to the participant view.
Undo and Redo work within each editor's recent history. Layout history includes presets, positions, visibility, participant defaults and timer appearance. Branding has its own history.
| Control | Effect |
|---|---|
| Turn Custom layout off | Uses the built-in view while preserving custom positions. Explicit participant defaults remain active. |
| Reset Landscape layout | Restores only landscape geometry and visibility. |
| Reset Portrait layout | Restores only portrait geometry and visibility. |
| Reset timer appearance | Restores timer colours, opacity and text size. |
| Reset branding | Restores branding defaults without moving layout elements. |
Resetting an orientation asks for confirmation. Enabling a saved layout does not restore old branding colours; layout and branding are saved independently.
Share the designed room
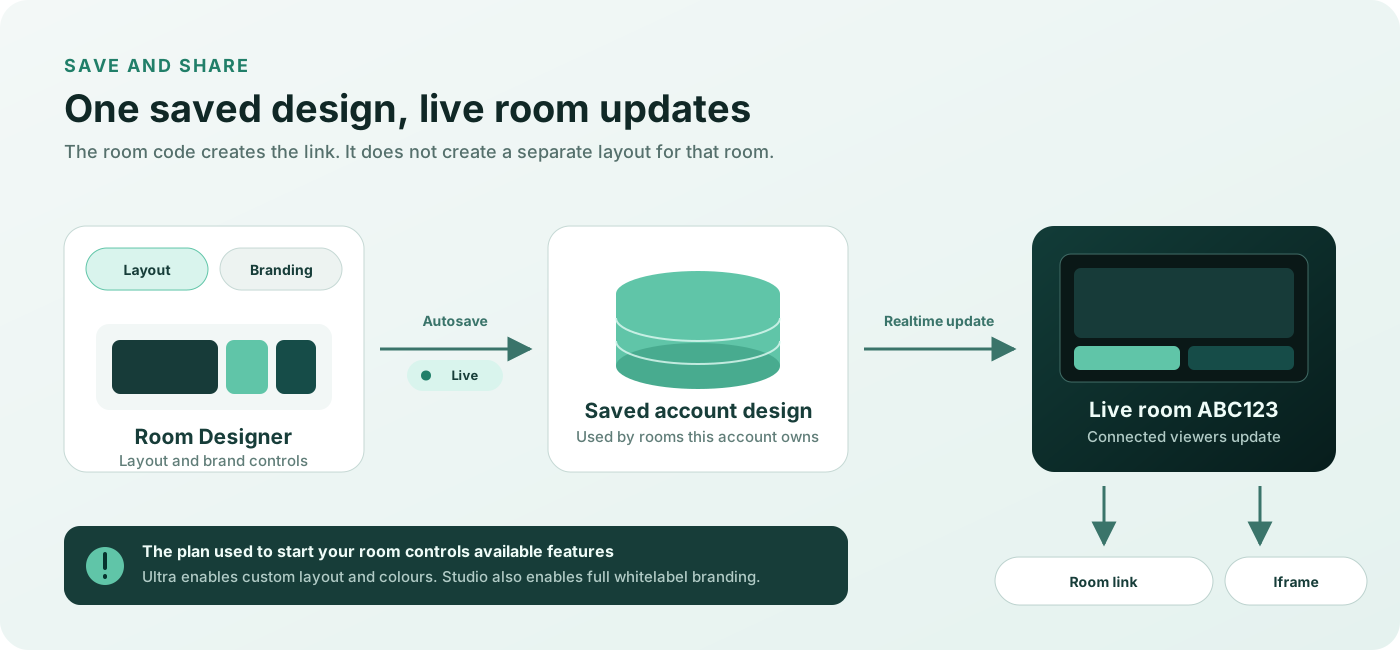
Enter the six-character room code in Embed your room. Copy the iframe, open the room, or share the displayed link. The normal room link carries your saved layout and eligible branding automatically.
<iframe
  src="https://cliqer.io/ABC123"
  allow="camera; microphone; fullscreen; autoplay"
  style="border:0;width:100%;aspect-ratio:16/9"
  title="Cliqer room"
></iframe>
Replace ABC123 with your active room code. If you change the iframe proportions, check the portrait design at narrow sizes too.
Source selection and view limits
Choose the capture source, screen, camera, NDI feed, Studio Program and audio input in the host app. The Designer does not select or lock a source through a URL. See Screen Sharing and Video Encoding and Screen Share Audio.
Custom boxes apply to the single-stream room view. A multi-host grid uses its built-in arrangement; selecting one stream allows the custom arrangement to apply again. A screenonly=true link uses the dedicated video-only view.
The settings toolbar, chat, connection messages and system notices keep their built-in positions. Hiding a box changes the view; it does not revoke a participant's permissions or stop the host's source.
Troubleshooting
The Layout tab or logo control is locked
Custom layouts require Ultra or above. Ultra can move and resize the Cliqer wordmark. Replacing or hiding Cliqer marks requires Studio or above. If the editor is available but the room uses the default look, check the plan or key used to start the room.
A saved change does not appear
Check Saved, room ownership, the room's plan or key, and the viewer's current orientation. Custom geometry also needs Custom layout on. Check for a multi-host grid, a screenonly=true link, or URL parameters overriding colours, theme or logo behaviour.
The timer is visible in the preview but absent in the room
The preview always has sample times. The real room needs a live host countdown. Check the Timer eye control in the current orientation and confirm that the host is sharing a countdown.
The logo is missing
Check the room's Studio entitlement, the uploaded Wordmark, its Show setting, and the active orientation's Logo eye control. The host icon and participant wordmark are separate assets.
Video or notes are empty
The video box needs a source shared by the host. Notes need content for the current slide, an open participant notes control, and a visible Notes element in a custom layout.
Participants cannot click
Show at least one navigation button in the active orientation. Use its eye control or reset that orientation.